How to speed up website by WP-Rocket & Cloudflare with our theme

This article is our guide line for configuration WP Rocket(http://wp-rocket.me/) plugins and Cloudflare (https://www.cloudflare.com) with free package. Both of them are used on all my theme. Now, let get started.

This article is our guide line for configuration WP Rocket (http://wp-rocket.me/) plugins and Cloudflare (https://www.cloudflare.com) with free package. Both of them are used on all my theme. Now, let’s get started.

1. Config for WP Rocket, do follow:

1.1 Config tab “Basic Options”
wp-rocket-setting-01

Next to:
wp-rocket-setting-02

1.2. Config “Advanced Options”:
wp-rocket-setting-03
Then scroll down to check as image below. Then click “Save Changes”
wp-rocket-setting-05

1.3. Config tab “CloudFlare”, if not exist, go to 1.4:
wp-rocket-setting-06

1.4. Config “CDN”:
wp-rocket-setting-07

After all step above done, click “Save Changes” button.

2. How to config CloudFlare account:

2.1. Integrated DNS’s your domain to CloudFlare.
Login to account manager domain then change/point DNS value to DNS cloudflare’s server. In case you don’t know what to do, please contact domain provider.
With my domain, point to:
john.ns.cloudflare.com and wally.ns.cloudflare.com view here:
wp-rocket-setting-08

2.2 Add DNS your domain to DNS cloud’s server.
Login to cloudflare then go to DNS tab
wp-rocket-setting-09
Result as below(example) is ok. In case color of “cloud icon” is grey => not correct, you must click on “cloud icon” to change.
wp-rocket-setting-10
Hopefully this guide is helpful to you.
—————————————

If you have any troubles configuring your website applications with the above settings you can contact the Support Center by signing up and submit a new topic. G5Theme Support Team will be glad to assist you.

How To Renew or Extend Support

You are eligible to renew or extend your support subscription if you have less than 6 months support remaining and the author is still supporting the item. The cost of purchasing support can vary according to the different periods of your subscription.

For example, extending your support subscription while it’s still active costs less than renewing it when it has expired. To learn more about this, please read Envato’s ‘Extending and Renewing Item Support’ article found here.

 Step 1 – Login to your ThemeForest account and go to the Downloads tab.

Step 2 – Locate Your Theme purchase. On there, you’ll see how many months of support you have remaining, and beside it there’s an ‘Extend Now’ link. Click here to view an example.

Step 3 – Click the ‘Extend Now’ link, and it will redirect you to the Your Theme’s item page.

Step 4 – Click the ‘Extend Now and Save’ button.
extend-now

Step 5 – Once you click the ‘Extend Now and Save’ button, you’ll be redirected to the checkout page. Confirm your payment details and follow the on screen prompts to finish purchasing the extension.

How To Start Receiving Support

To receive G5Theme Support, please kindly follow these steps as below:

Step 1Click Here To Create An Account, you will need your ThemeForest Purchase Code which can only be received after buying the theme from Themeforest.net.

– Login on Themeforest.net and go to your Download page

– You will find out your PURCHASE CODE in that license file.

purchase-code

Step 2 – Once you are signed up, you need to sign into our support center with your new account.

Step 3 – Before you submit a support ticket please pay attention to the following things:

  • Make sure you are running the latest version of my theme by click Changelog on item description for each theme and the latest version of WordPress.

  • Check our Documentation and Knowledgebase for the answer to your question.
  • Disable any additional 3rd party plugins you may be using to see if it fixes the issue.
  • Make sure you’ve cleared all your caches.

Step 4 – If you cannot find the answer to your question, please submit a support ticket, and make sure that you create the support ticket in the forum theme you bought. G5Theme Support Team will be glad to assist you.

If you have more than 6 months support, You need to Extend your support subscription

Thank you very much for choosing G5Theme!

Before You Submit A Topic/Ticket

Welcome to G5Theme

We would like to say thank you for choosing WordPress development tools by G5Theme. Hopefully this extended knowledge base will help you find everything you need to use our item.

Before you submit a support ticket please check the following steps

  • Make sure you are running the latest version of my theme by click Changelog on item description for each theme and the latest version of WordPress.

  • Check our Documentation and Knowledgebase for the answer to your question.
  • Disable any additional 3rd party plugins you may be using to see if it fixes the issue.
  • Make sure you’ve cleared all your caches.
  • If you cannot find the answer to your question, please submit a support ticket, G5Theme Support Team will be glad to assist you.
  • To create a new ticket, choose the forum for the theme you bought to create a new topic.
If you still need further assistance please submit a ticket with your issue or question directly, and our fast and highly experienced support team will help you out.
Thank you very much for choosing G5Theme!

Fatal error “Allowed Memory Size Exhausted” error

The reason for this error is that your server configuration has a very low memory limit. Try adding this to wp-config.php (put it after <?php in this file):

define(‘WP_MEMORY_LIMIT’, ’96M’);

Please note that this limit is OK for the theme and the plugins that come with the theme. If you want to enable other plugins you may need to increase the limit further.

define(‘WP_MEMORY_LIMIT’, ‘256M’);

The official WordPress guide on this topic can be found here: http://codex.wordpress.org/Editing_wp-config.php#Increasing_memory_allocated_to_PHP

Blank screen after installing or when trying to activate the theme


If you upload the theme and then activate it but see nothing but a blank white screen, In this instance there will be no error messages, no hint as to what the issue is and no way to tell for certain how to fix it. When attempting to diagnose a white screen condition consider what you did before the condition occurred:

  • Did you install an upgraded version of WordPress, and did you check to see if the white screen occurred before you installed and activated your theme?
  • Did you install any plugins prior to installing the theme?

A blank screen in WordPress can be caused by a myriad of things. It can show up on an admin page while the rest of the website works perfectly. You may even experience a blank screen on one post while the others are flawless. In most instances, the blank white screen is caused by an exhausted memory limit for WordPress. Having too many plugins running simultaneously or a faulty plugin could be taking up the memory.

Here are some of the most common and easy fixes to try before you start delving into some of the more deeper issues.

Fix 1: Clear Your Cache

One of the easiest ways to solve the white screen of death in WordPress is by emptying your cache. If you can access the admin panel but the front end of the site is displaying a blank screen, you may have to empty the cache used by certain tools. This problem is often caused by a caching plugin and can be quickly fixed from the admin panel. You can consult our guide here:   How to Clear Cache

Fix 2: Check the Memory Limit

Exhausting the memory can cause a white screen to appear. Sometimes it may be accompanied by a message that the memory size has been exhausted. In this case, you may need to increase your memory limit in WordPress.  Check with your web hosting service and ask them to increase your PHP memory_limit to at least 96MB. 128MB is recommended. You can consult our guide on how to Increase the Memory Limit in WordPress

If the blank white screen persists, then the memory wasn’t the problem and it’s time to check the plugins.

Fix 3: Disable Plugins

The wrong plugins can cause all kinds of issues on a website. While many developers try to make everything compatible, sometimes these additions break each other or have the slightest error in the code. As a result, the site can break down.

There are a number of ways you can deactivate plugins, and it also depends on whether you have access to the admin panel of WordPress.

If you’re unable to access the admin panel, you can delete plugins by using FTP. Go to the root folder of your website, access wp-content and open the plugins folder, you can delete those files directly.

 Afterward, you should be able to access your website. That is, if it was a plugin causing the issue.

Fix 4: Changing the Theme

The most likely issue associated with a theme being the cause of a white screen condition is when the upload of the theme did not complete the transfer of all files, the transfer resulted in corrupted theme files, or you have PHP configuration memory limits set too low. So please try this solution:

Access your admin area if you can and disable all plugins as described above, change the theme to one of the WordPress default themes. Check to see if this resolves the problem. If it does, try reinstalling the theme by completely removing the old copy in /wp-content/themes/ and installing a fresh copy (I recommend using FTP to do this because you less likely to run into errors than when you use HTTP WordPress theme installer) Activate the replacement theme and see if the white screen condition returns.

If you cannot access your admin area, use an FTP client to access your site. Disable your plugins by following step #3 in the plugins instructions above, and delete the theme entirely.

This will force WordPress to use the default WordPress theme. See if the problem persists. If it does, then the problem is likely in your WordPress installation. If the problem does not occur, then install a fresh copy of the theme via FTP, activate it and see if the problem reappears.

Fix 5: WordPress in Debug Mode

Check your error logs. You can change the blank screen in WordPress to show you errors which may help you fix the problem. This is done by accessing the wp-config.php file in your root folder.

Create a backup of the wp-config.php file. Using an editor, add the following code to the file and save it to the site:

error_reporting(E_ALL); ini_set(‘display_errors’, 1); define( ‘WP_DEBUG’, true);

When you access the website again, this time the blank screen will list the errors in the system. By tracking down these errors, you may find even more solutions to the problem.

Run a PHP validator on the code prior to saving. It will catch a lot of simple mistakes.

Fix 6: Checking Other Site Issues

If you have more than one instance of WordPress running on a server, find out if the other sites are having the same issue. This can help you eliminate many possibilities. For instance, a problem on one WordPress site and not the others can lead to: Faulty plugins Bad themes Custom coding issues Compromised files from hacks or malware If the white screen is displayed on all of your sites, then there is more than likely a problem with the server itself. In which case, you will need to contact your web host provider or network administrator.

Besides, there is a list of possible other causes for the white screen condition here because they too can cause this error:

  • Blank space in functions.php – This is easy to do if you’ve been modifying the file. A good way to check is to replace it with the unchanged version of the file and see if the site works.
  • Blank line in wp-config.php – a blank line at the start of this file can bring on the White Death. Check for extra spaces at the end as well.
  • File Permissions – Make sure all the directories are set with permission of 755 and the other files 644. This should not happen because the server should inherit the permissions of the files that get uploaded to the server. But we have seen occurrences where, for example, unpacking a ZIP archive using CPANEL and other interface tools botched permissions.
  • Multiple Plugins – When you’re reactivating your plugins, the first one you find that causes the problem may not be the only one. Sometimes its a combination of two or more. So you may think you have the problem solved, but it may still exist and come back in the future.

—————————————

500 Internal Server Error

If you just installed WordPress, a WordPress plugin, or a theme for your site and out of nowhere your site returns a 500 Internal Server Error, please read the information below.

There are five major reasons why these errors occur in WordPress:

Incorrect web server configuration

Incorrect folder/file permissions

Corrupt files or files that contain errors in code

PHP memory limits set too low

Conflicting third party plugins

1. Incorrect web server configuration – If your web server (whether it be Apache or IIS) is configured with incorrect directives, they can cause 500 errors to occur. The problem is that web hosting support will often blame the error on software you have installed without even checking to see what is contained in their error logs. Just know that after you have checked the following remaining causes, and they fail to resolve the issue, you will need to (sometimes forcefully) get your web host to help diagnose and fix the problem.

2. Incorrect file permissions – With very few exceptions, file permission for WordPress, plugins, and themes need to be set at 755 for folders, and 644 for files. You may think that setting permissions more loosely, like 777, will relieve the problem, but you would be wrong. Setting permissions either too strict or too loose often cause this and other errors.

3. Corrupt files or files that contain errors in code – Usually improper/errors in file transfers to the web server cause corruption to occur. It may look like the file is sitting there just fine, but something in the process caused the file to be unusable by the server. For example, if you uploaded a text file in binary language instead of ascii it will render the file unreadable by the web server. Coding errors can also create this error, whether that be in WordPress, a plugin, or a theme.

Often, the only way to resolve an error in WordPress core is to reinstall WordPress.

If it is plugin related, deactivating all plugins will relieve the error.

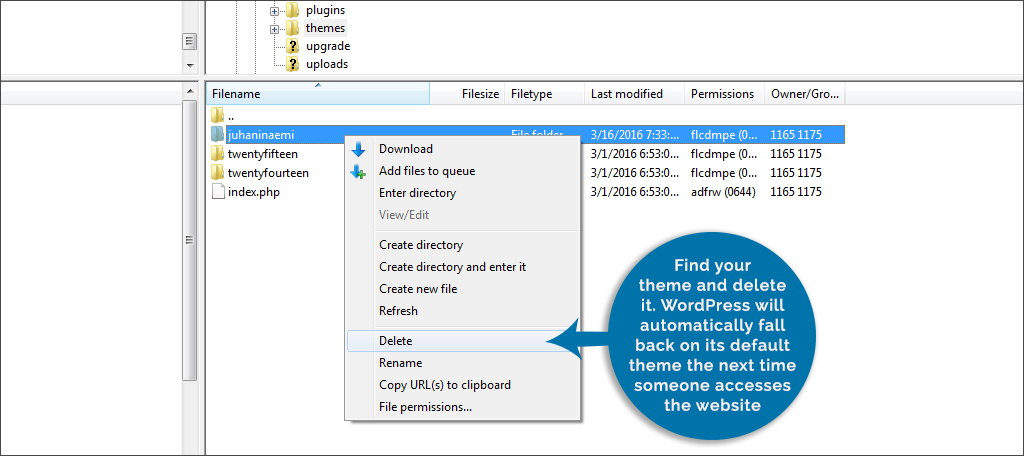
If it is theme related, deleting and reinstalling the theme will often take care of the problem.

By far the most common 500 error produced by a file is related to the WordPress .htaccess file. The .htaccess file is primarily designed to be used with custom permalink structures. But it is also used by some third party plugins, and for overriding certain server configuration directives if allowed. If it contains errors, it can return the dreaded 500 internal server error. The .htaccess file is located in the root folder of your WordPress installation (not the theme).

log into your site via FTP (Filezilla, etc.)

download a copy of your .htaccess file, rename the copy e.g. “.htaccess-backup”

delete the .htaccess file residing on your Web server

create a new blank file called “.htaccess” on your PC/laptop/Mac

upload this new file to your Web server in the same place as the original .htaccess (which you deleted)

navigate to your WordPress admin URL, e.g. http://www.yoursite.com/wordpress/wp-admin, and you should now be able to log in!

finally, once logged in, navigate to the Permalinks settings page in the admin console and do nothing further. Simply going to the settings page should enable WordPress to write the correct .htaccess declarations itself.

You should now be able to nagivate to www.yoursite.com or http://www.yoursite.com/wordpress (depending on whether WordPress is running your entire site or just a blog etc.) and all should be well once more.

4. PHP memory limits set too low.

You can ask your web host to increase your PHP limits. You will find the recommended limits below

5. Conflicting Third Party Plugins Should Be Deactivated

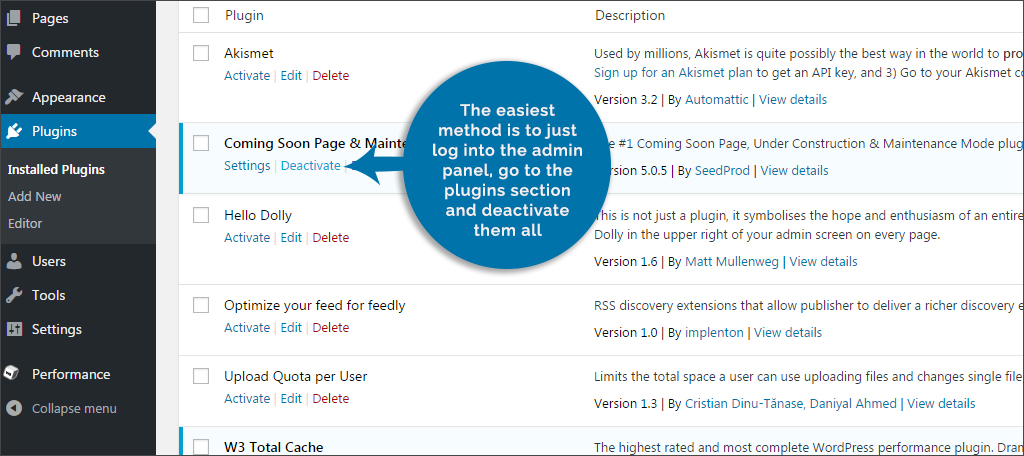
If you can access the admin area of your site, login to your admin section and deactivate all plugins. After doing so, check your front end page again. If it loads without error, you have a plugin conflict. Now, start activating each plugin one by one. When you see the 500 error again on the front end pages, you will know that the last plugin you activated is the likely culprit. Deactivate it and continue checking all remaining plugins one by one to make sure there are no others.

If you are getting the 500 error on the front end and the back end admin area, then you will need to access your site via an FTP client. A little known trick is to change the name of your/wp-content/plugins folder to something else temporarily like “plugins.bak.” This will make WordPress ignore your plugins. Then check to see if this resolves the problem. If it does, log into your admin section and then change your plugin.bak folder back to plugins. Then deactivate all of your plugins via your admin page.

Recommended PHP configuration limits are as follows:

max_execution_time 100

memory_limit 256M

post_max_size 32M

upload_max_filesize 32M

You can verify your PHP configuration limits by installing a simple plugin

(Source : http://theme-fusion.com/knowledgebase/500-internal-server-error/)

How to Change Portfolio Fields Name Extra Attributes on BackEnd/FrontEnd?

This article will focus on show you How to change fields name Portfolio on backend and frontend (ex: Darna theme), it may be work similar to others G5Theme items.

Solutions:
1. Change via languages file(po/mo):
Please refer our guide on How to Change Language: https://support.g5plus.net/knowledge-base/how-to-change-languages-via-pomo-file/

2. Change via update/edit php files (it will lost when you update plugins to latest version, so you need backup carefully before):
2.1 Change on Backend Editor:

backend-extra-portfolio

Edit file portfolio.php on path: \plugins\darna-framework\includes\shortcodes\portfolio then change as below:

backend-code-php
2.2 Change on FrontEnd Editor:
front-end-extra-portfolio
Edit file small-slider.php on path: \plugins\darna-framework\includes\shortcodes\portfolio\templates\single  then change like this:

fontend-php-code

Done.

Hopefully this guide can help you change Portfolio fields name extra attributes on BackEnd/FrontEnd fastest.
If you have any troubles configuring your website applications with the above settings you can contact the Support Center by signing up and submit a new topic. G5Theme Support Team will be glad to assist you.

Thank you very much for choosing G5Theme!

How To Update/fix WooCommerce Out Of Date

In this article, we will show you How to update/fix WooCommerce out of date.
– To check if there are any updates available for your website, you can go to WooCommerce > System Status

woocommerce1
– Scoll down to Templates, then find exactly find had warning on your hosting/server, for example:

woocommerce2
In above image, the path is handmade/woocommerce/product-searchform.php

– Open this folder, then edit/change value below to lastest version as you want:

woocommerce3

You can also refer more from documentation of WooCommerce author here: https://docs.woothemes.com/document/woocommerce-self-service-guide/

If you’re still having trouble upgrading your theme after reading this post, let us help! G5Theme awesome support team can help you with any issue.
Thank you very much for choosing G5Theme