Hopefully that this list video guides will help you have a visual looking for using all options in ORSON
Archives: Knowledge Base
How To Use Custom Footer in MOWASALAT/ORGANIZ/BEYOT theme
This guide only uses for MOWASALAT, ORGANIZ and BEYOT theme!
Custom Footer function is extra Footer Area building options in some themes developed by G5Theme. It have not been included in these theme items: ORSON,PITHREE, PORTON, HEARTSTONE, ACADEMIA, MEGATRON, HANDMADE, WOLVERINE, DARNA, INNOVATION, GROVE, ZORKA, CUPID.
In this article we will show you How To Create and Use Custom Footer on MOWASALAT theme. It’s the same way with using Custom Footer in ORGANIZ and BEYOT theme. In these themes, you can build Custom Footer by Visual Composer elements, then set it to be Above Footer (remain Main Footer) or replace Main Footer in the Theme Options and in Preset as well.
To learn more about “How to build Main Footer” please refer to our article here: https://support.g5plus.net/knowledge-base/how-to-build-main-footer/
This video focuses on Custom Footer function in G5Theme Options. This video explains how the Custom Footer work and how to use them properly on your website.
Some instances you’d want a page/post have a different footer than the rest of your sight, you can use Custom Footer function in G5Them Options
1. Add New Custom Footer
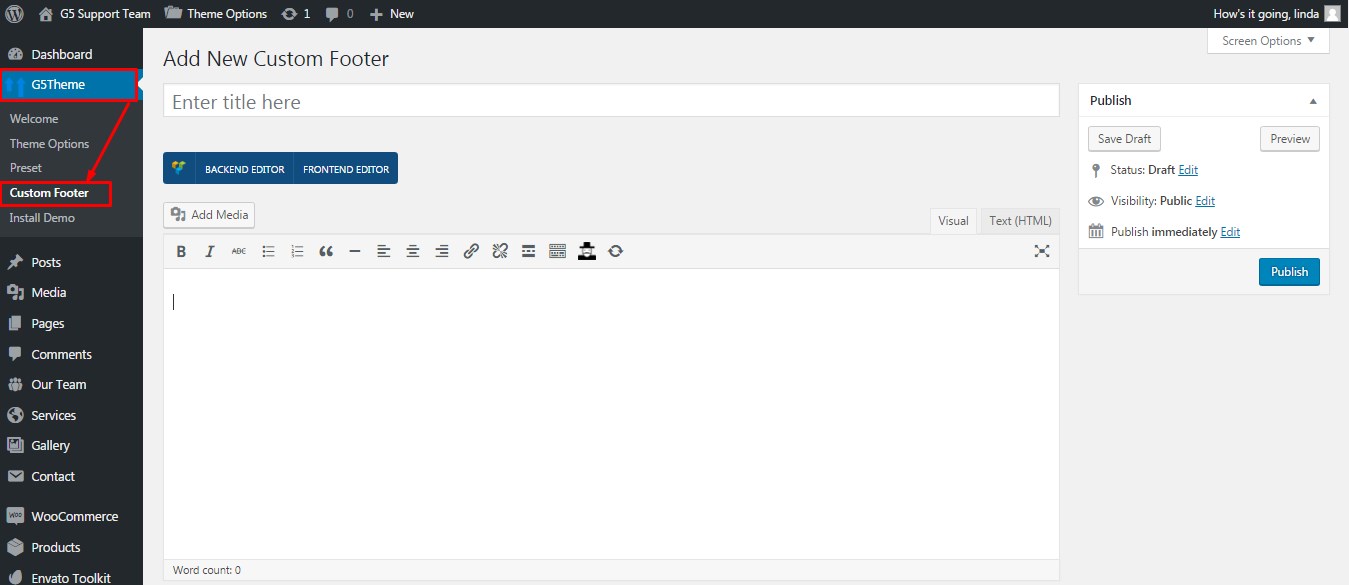
Add new an Custom Footer item
2. Set Custom Footer in Theme Options (or Preset)
You use this function to create a new Custom Footer that:
- You can set it to be Above Footer (remain Main Footer)
- You can set it to replace Main Footer
in Theme Options or Preset Settings
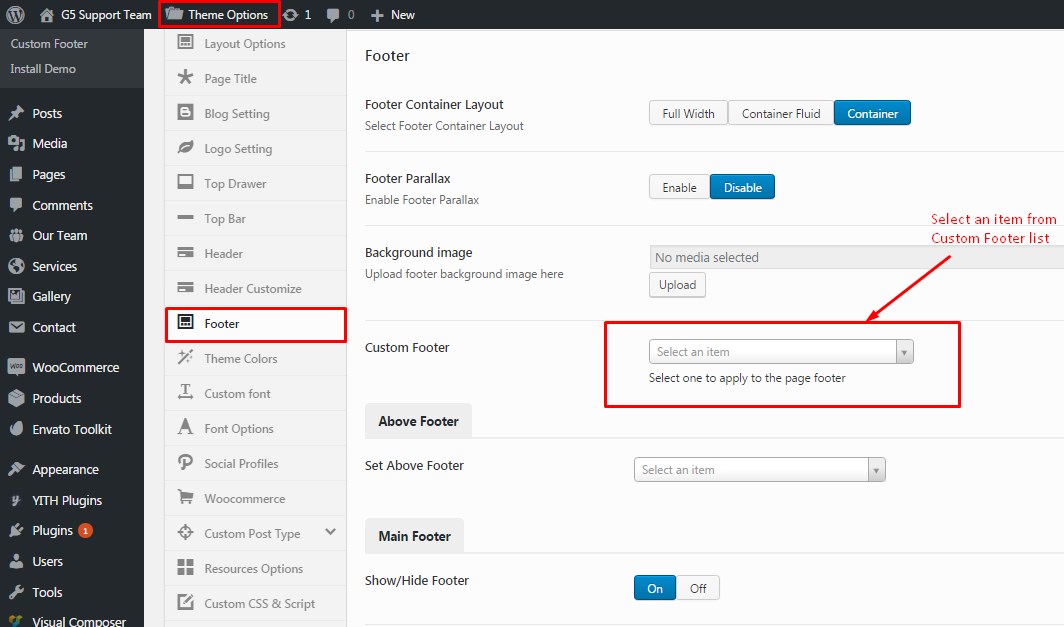
Custom Footer in Theme Options
How To Build Main Footer
This guide use for these theme: ZORKA, DARNA, GROVE, MEGATRON, HANDMADE, ACADEMIA, PITHREE, ORSON, RICA, ARVO, MOWASALAT, MOVECO, ORION, BEYOT, ORGANIZ
The main portion of the Footer Area is a widgetized section that can display widgets in 1-6 columns. Widgets add various content or features to your site. They can be added, removed, and rearranged in the Appearance > Widgets tab on your WordPress admin panel.
Add Widgets To The Footer
Step 1 – Navigate to Appearance > Widgets to access the widgets and footer widget sections.
Step 2 – You will see a ‘Footer Widget X’ (Footer 1/Footer 2..) section on the right hand side for each footer column you selected to have in Theme Options.
Step 3 – On the left hand side are your widgets, simply drag and drop the widgets you want from the left side into the ‘Footer Widget’ sections on the right side. See the screenshot below.
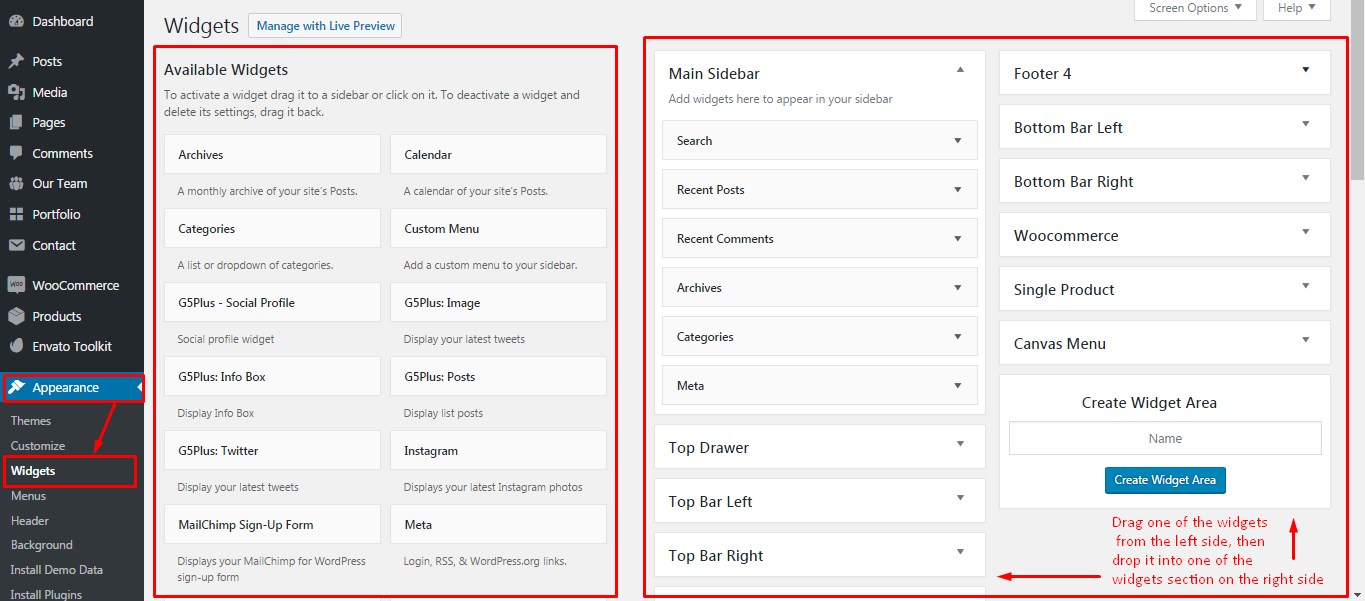
Add widget
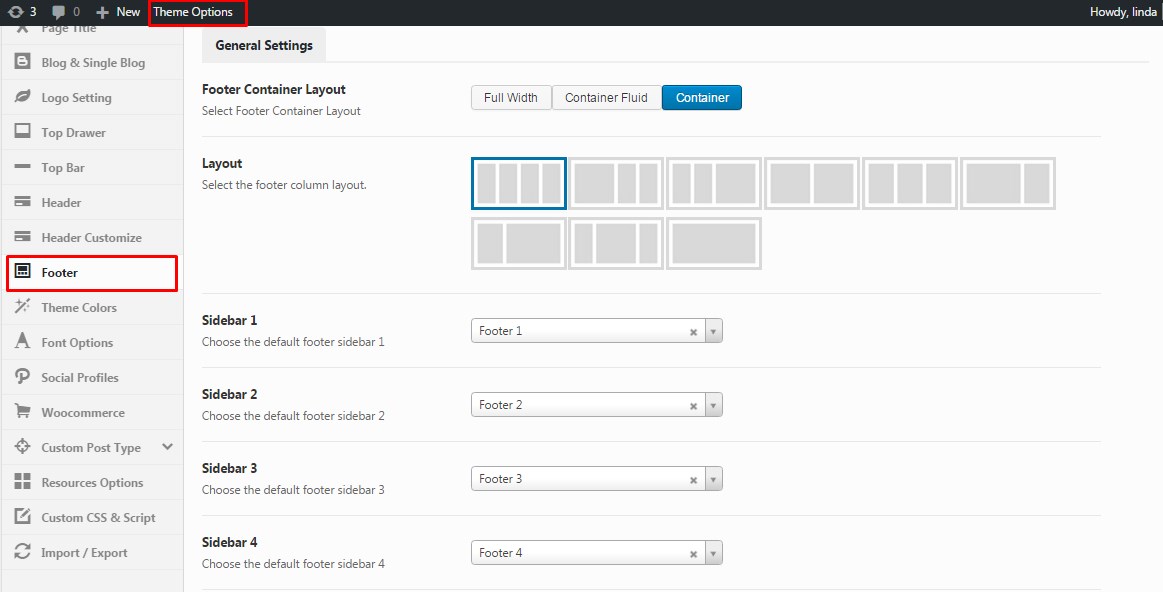
Footer Settings
Navigate to the Appearance > Theme Options > Footer panel and switch the ‘Main Footer’ option to On to Enabled Main Footer . Set how many columns you’d like to display by customizing the Layout option.
NOTICE: Recently, we use Content Block (Content Block is specific layout of Visual Composer elements saved) to display in Footer area. Please consult this guide: https://support.g5plus.net/knowledge-base/how-to-use-content-block/ for further details.
———
If you have any troubles configuring your website applications with the above settings you can contact the Support Center by signing up and submit a new topic. G5Theme Support Team will be glad to assist you.
Thankyou for choosing G5Theme!
How to Build One-page
Home OnePage aims to focus the user’s attention to the content that they want. When you choose an item on Main Menu of OnePage, it immediately navigates to the section that you’ve chosen
OnePage sites have became a trend recently, and G5Theme can help you do it easily with below instruction:
Step 1 – You just have to create a Menu with Links as items.
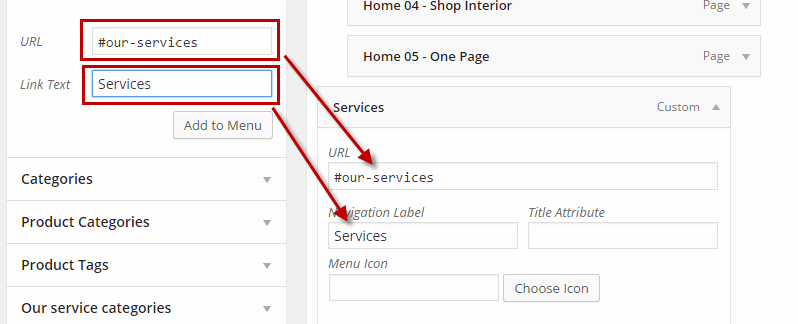
Step 2 – Go to your homepage, anywhere you want the menu item to navigate to section, please edit row by Visual Composer and type id on field: Row ID
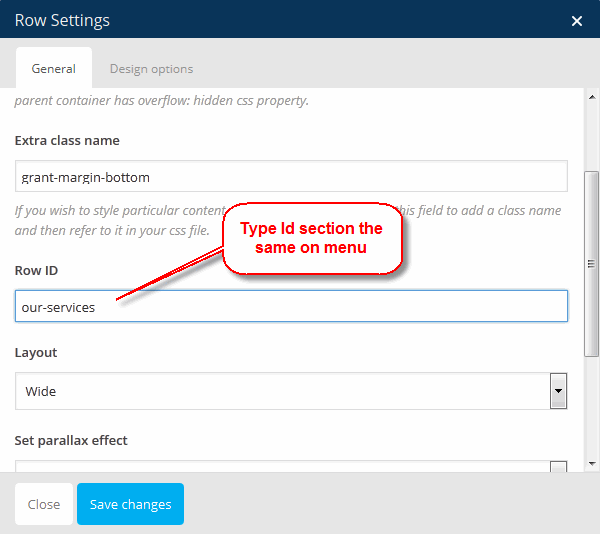
You could consult below video guide, we used ORSON theme for example but this process is similar to the process of building OnePage on other G5Theme item.
———
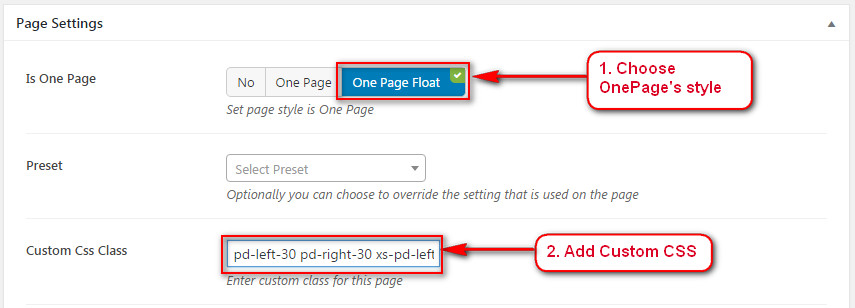
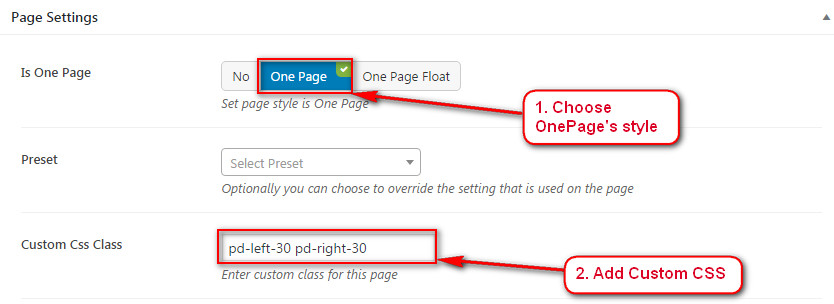
Specially, on ORION Theme, we have 2 styles of OnePage: OnePage and OnePage Float
- OnePage Float style was used for Home Creative Designer Dark Demo
- OnePage style was used for Home Creative Designer Demo
In ORION, after 2 steps building content to your Homepage as above, scroll down to Page Settings area to choose style of OnePage and add custom CSS:
Custom CSS for OnePage Float: pd-left-30 pd-right-30 xs-pd-left-15 xs-pd-right-15
Custom CSS for OnePage Float: pd-left-30 pd-right-30
List Video Guides on How To Use All Options in MOWASALAT
Hopefully that this list video guide will help you have a visual looking for using all options in Mowasalat
How To Change Language in G5Theme Using LOCO Translate Plugin
Themes that support multi-language is not an automatically translate content function, it is the feature that allows us to write more than one language on the website. It means that you have to translate the phrase in theme and plugins into many different languages by yourself.
Translating using Poedit
First of all, you will need to download .PO/.pot file editor like Poedit or other. It is possible to use any text editor but it will be so much easier to use Poedit than regular text edit so I strongly recommend to download it. It’s free, works on Mac, Windows, and Linux and there is no reason not to use it.
I had an article on How to change languages via po/mo file which makes it easier to use Poedit to translate G5Theme into your own language.
Translating using LOCO Translate plugin
We hope you find out how to translate a WordPress theme and now can give back to the community by translation themes and plugins for others to use. G5Theme proudly provides Premium WordPress themes with over 5000 satisfied users every year and we hope you will do that with theme translations as well.
How G5Theme Options Work
In this article, we will show you the relationship between Theme Options, Preset and Page Options and How to use them to create your website.
These Options are the backbone of these themes: ORION, MOVECO, MOWASALAT, RICA, ARVO .They give you full control over your website and allow you to customize the design without touching a single line of code.
There are 3 major groups of options you can set in our themes: Theme Options, Preset, Page Settings
– Page Options: Located within each page and post. Page Options will only affect the individual page you change them on and overrides options set in the Theme Options.
– Preset are Page Options that were set beforhand to facilitate use, and overrides options set in the Theme Options.
– Theme Options : Located in WP Dashboard > G5Theme > Theme Options these options are global options that affect your entire website.
Click here to watch the Video guide (Mowasalat was used for example in this video)
NOTE: Preset and Page Options will use the Theme Options value if left empty or if the value is default. They will override Theme Options if any other value is entered. This setup gives users maximum flexibility for setting a global theme option, then being able to override it on a page/post/shortcode basis. Please see below for an example of an option that has both a theme option and a preset.
– Theme Options & Preset –
If you choose default for a page option, it will use the selection you have made in Theme Options. Select a different value to override the theme option.
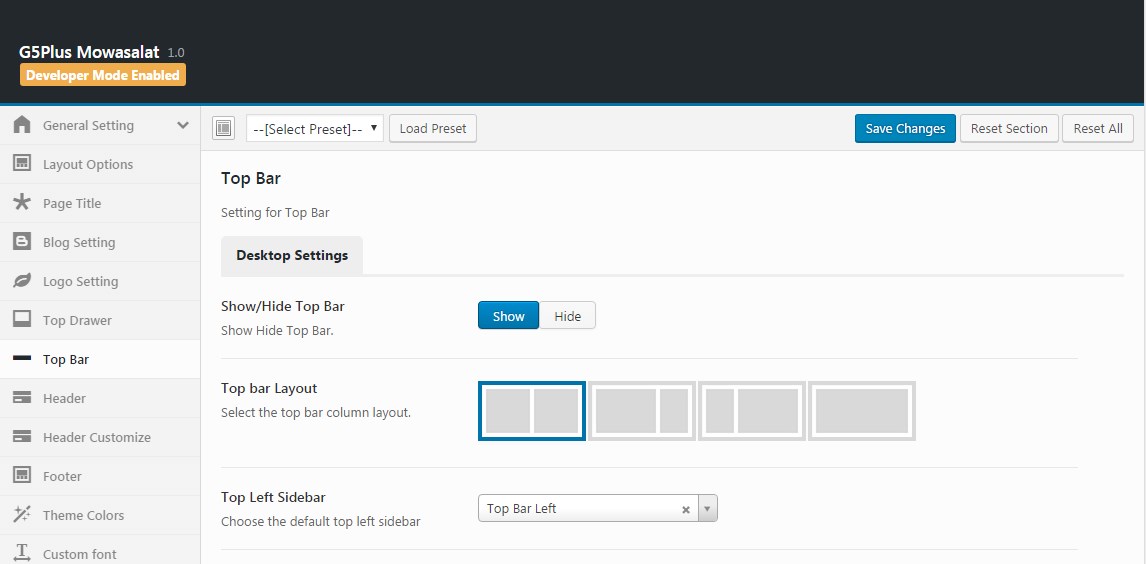
Theme Options
Below is a screenshot of the Top Bar section in Theme Options. The Show/Hide Top Bar option is set to Show, which means your Top bar will be displayed on all the pages throughout your site, unless otherwise specified in Preset
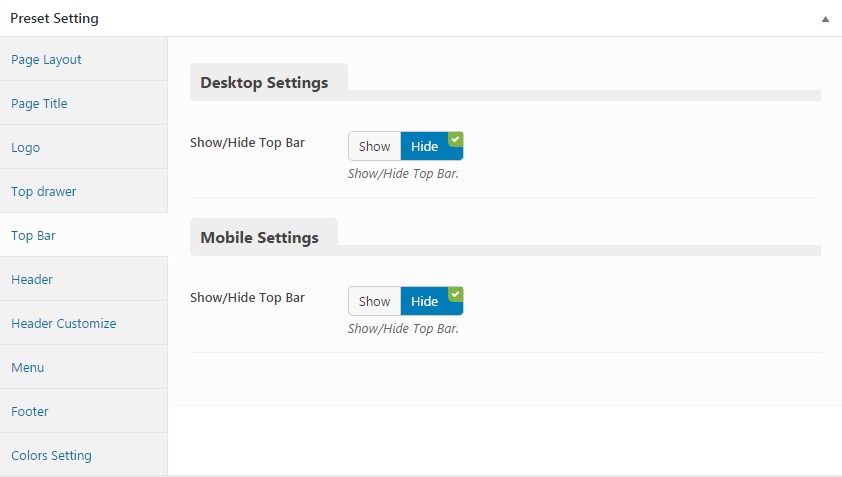
Preset
Below is a screenshot of the Top Bar section in Page Options. The Show/Hide Top Bar option is set to Hide, which means on any page apply this preset, you are overriding the same global theme option and your Top Bar will be not display.
– Preset & Page Options –
If you choose default value in Page Options, it will use the selection you have made in Preset or Theme Options. Insert a different value to override the Preset or Theme Option value.
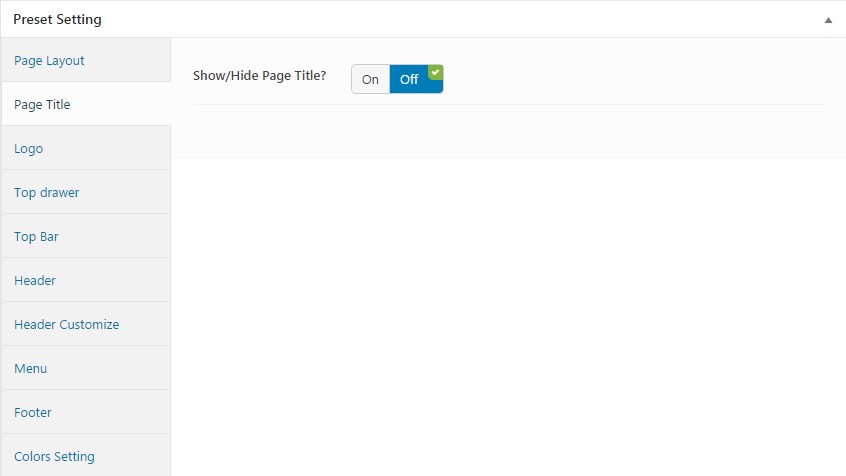
Preset
Below is a screenshot of the Page Title section in Preset. The Show/Hide Page Title option is set to Off, thereby on any page apply this preset will be not display Page Title unless the corresponding option in Page Options is set other value.
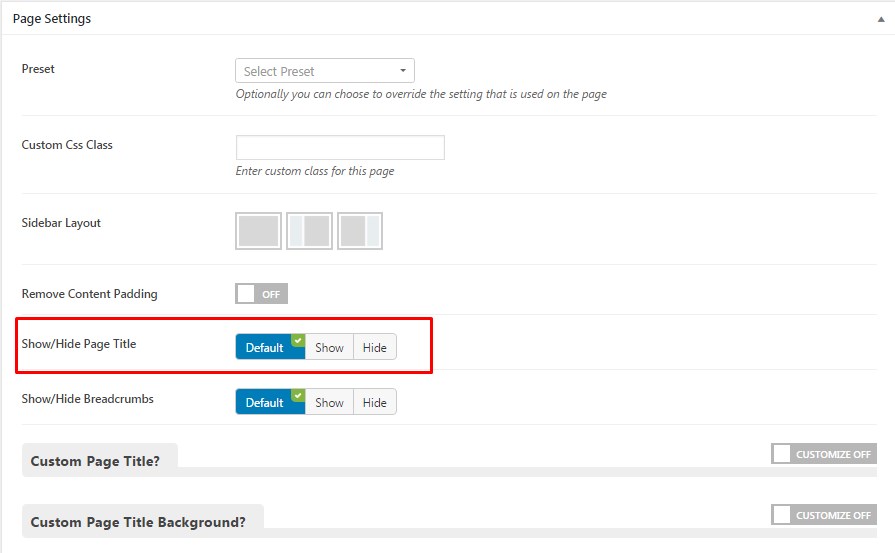
Page Options
Below is a screenshot of the Page Title section in Page Options. The Show/Hide Page Title option is set to Default, which means that it will use the value you have set in Preset (if this page apply any Preset) or Theme Options. Insert a different value to override the Preset/ Theme Option value.
If you have any troubles configuring your website applications with the above settings you can contact the G5Theme Support Team by signing up and submit a new topic. G5Them Support Team will be glad to assist you.
How to Fix Load Google Maps Correctly
1. Fix error google map doesn’t work
You might be see screen as the below screenshot when face to error google maps doesn’t work:
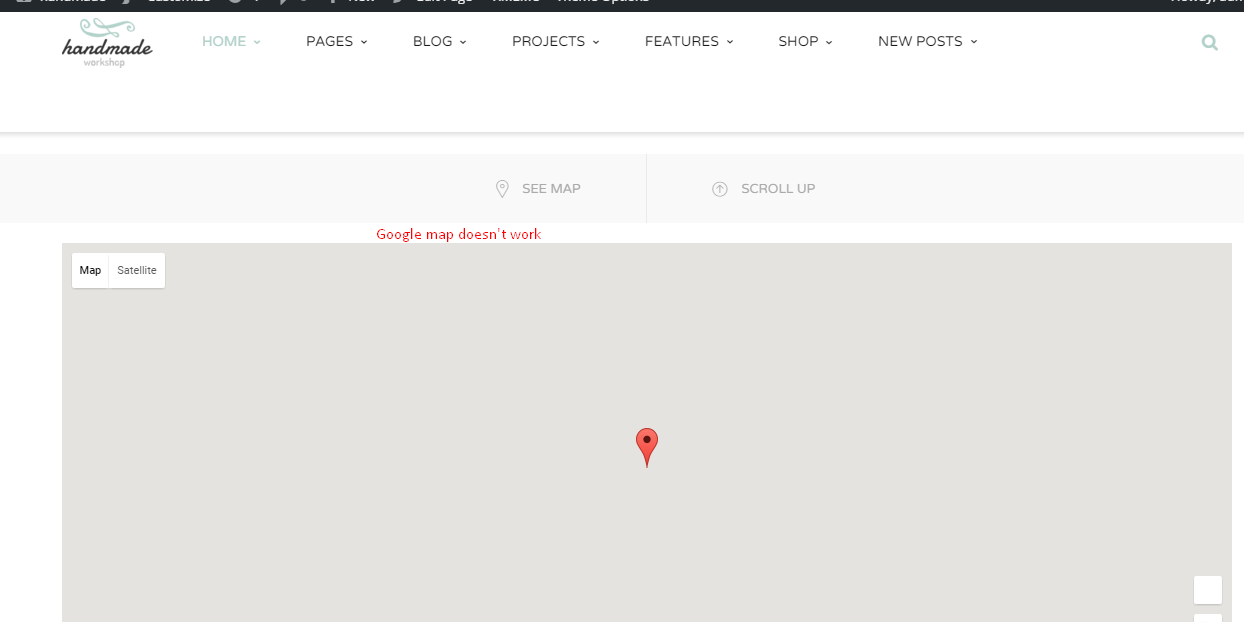
This is guide apply for HandMade Theme, other themes do the same
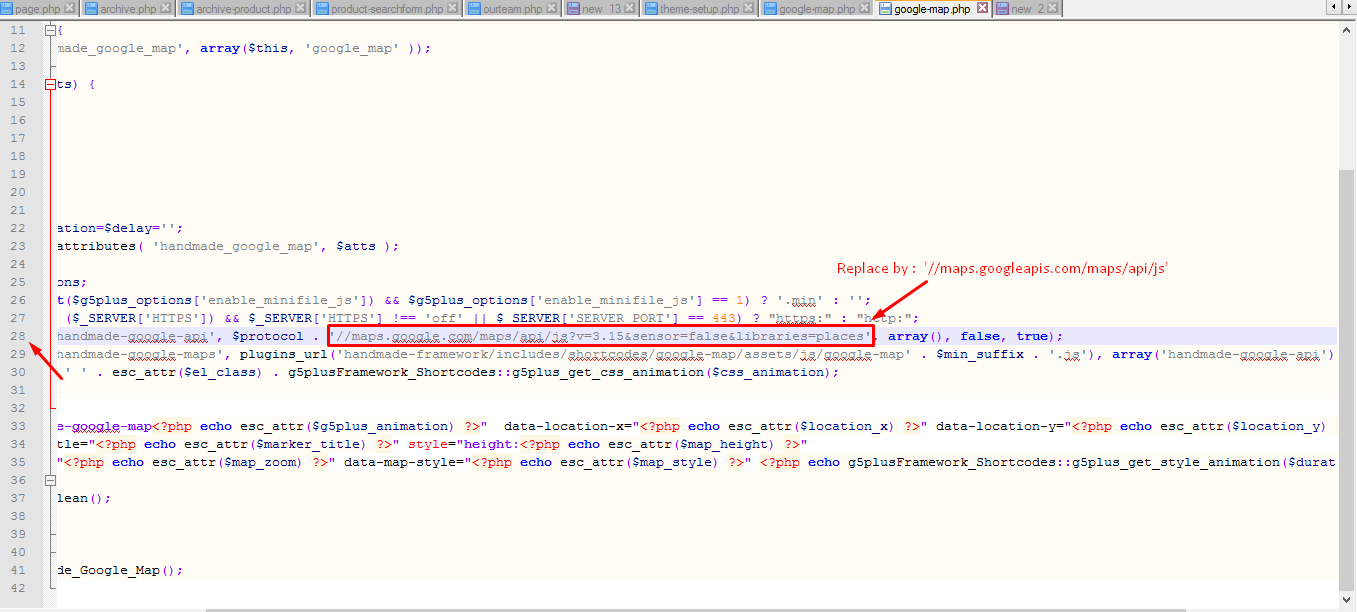
Step 1: Go to google-map.php file with path:
“your folder\wp-content\plugins\handmade-framework\includes\shortcodes\google-map\google-map.php”
Step 2: Edit google-map.php file:
Replace code ‘//maps.google.com/maps/api/js?v=3.15&sensor=false&libraries=places’ by ‘//maps.googleapis.com/maps/api/js’ (line 28) as here:
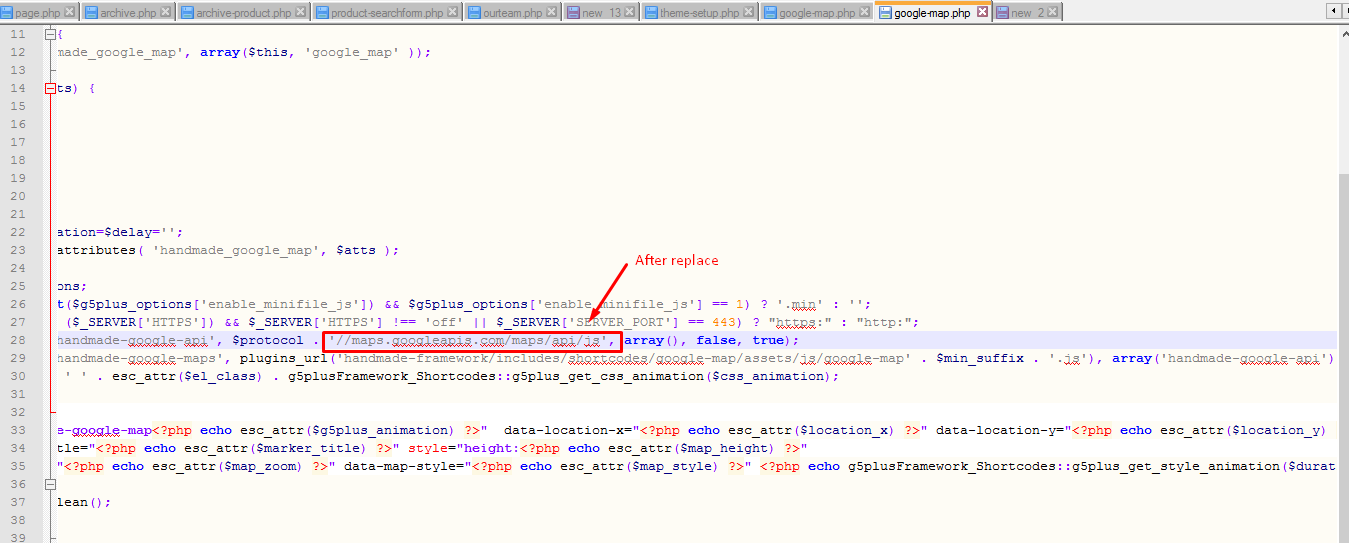
Step 3: Save and upload google-map.php file come back.
google-map.php file after edit:
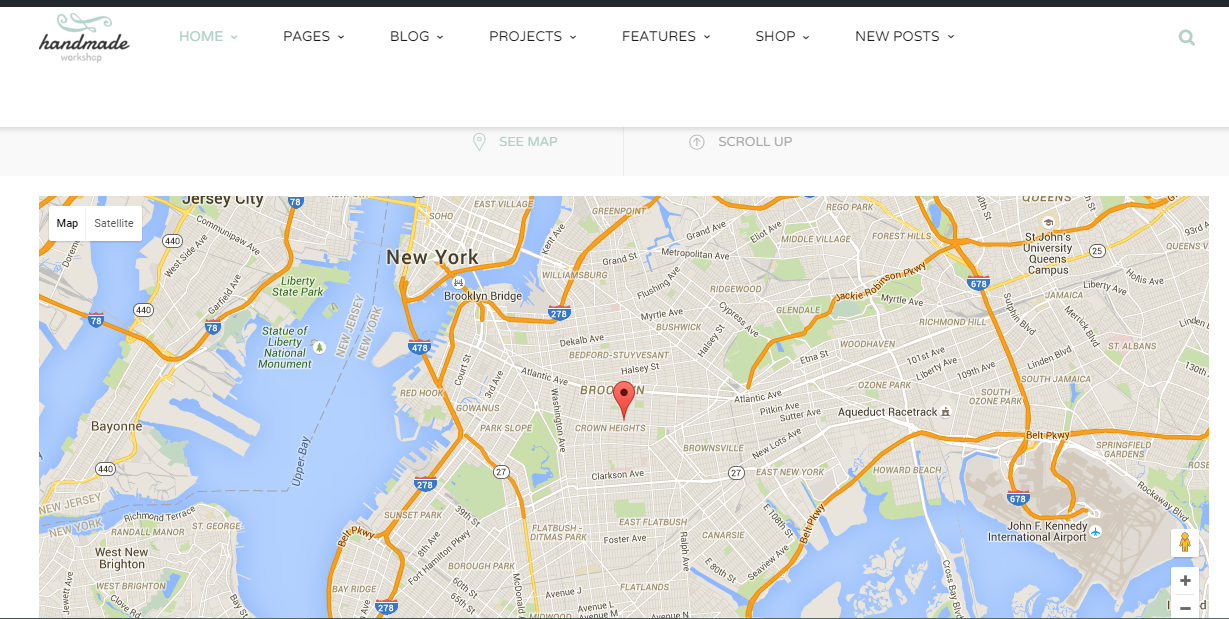
– Back to frontend then Ctr+F5(or remove cache) to check.
Result:
2. Fix “This page didn’t load Google Maps correctly” error
Are you seeing “This page didn’t load Google Maps correctly” in place of maps on your website? This error has become a lot more common since Google Maps started requiring an API key on June 22, 2016 (after about 10 years of allowing keyless use). If you started using Google Maps on your website on or after that date then you will need to sign up for and implement a free API key (older users still do not need a key).
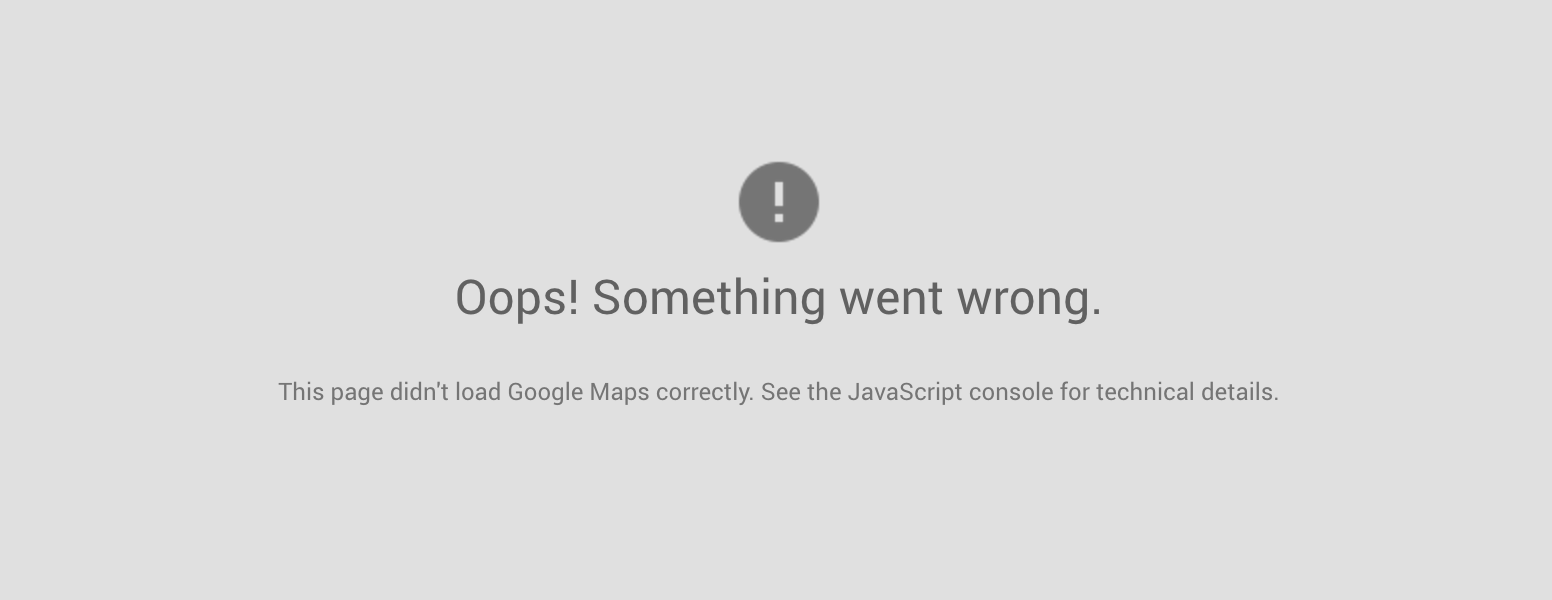
This guide will show you to know how to fix the “This page didn’t load Google Maps correctly” error on their website.
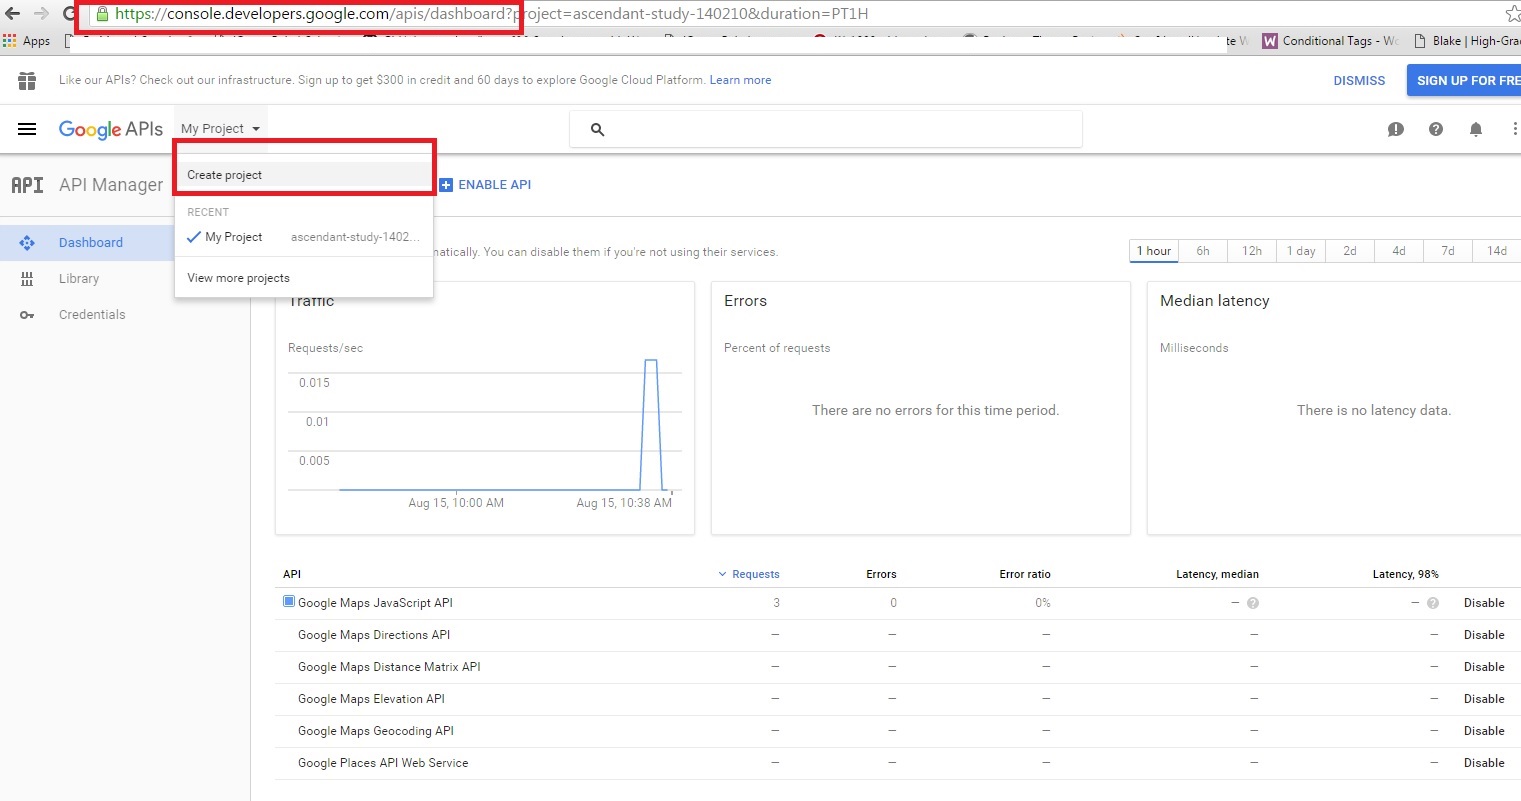
Step 1: Please go to domain below then create a project:
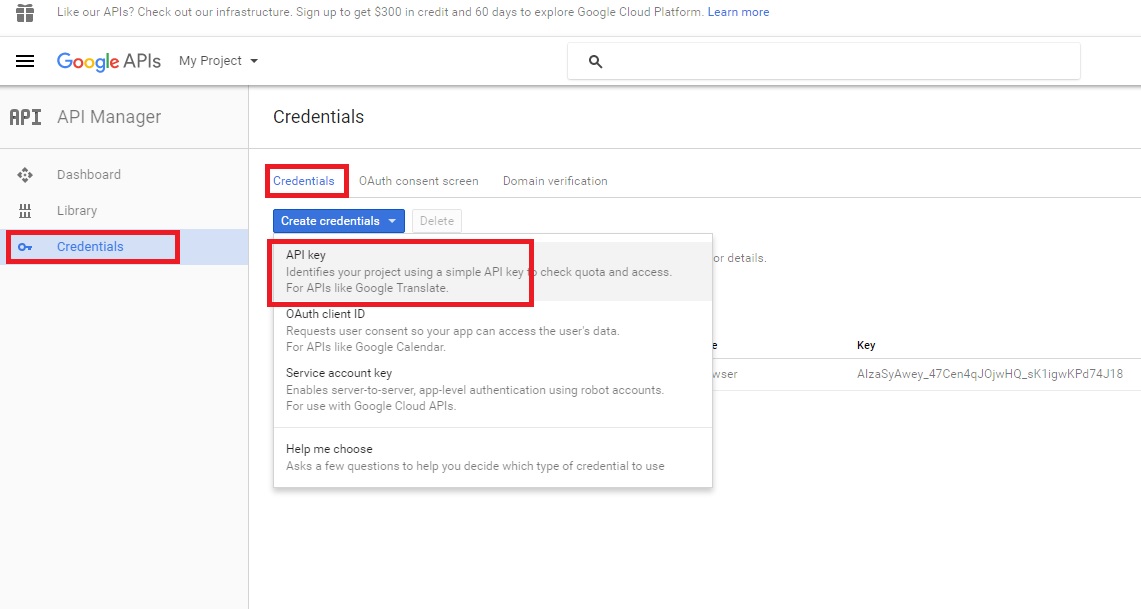
Step 2:
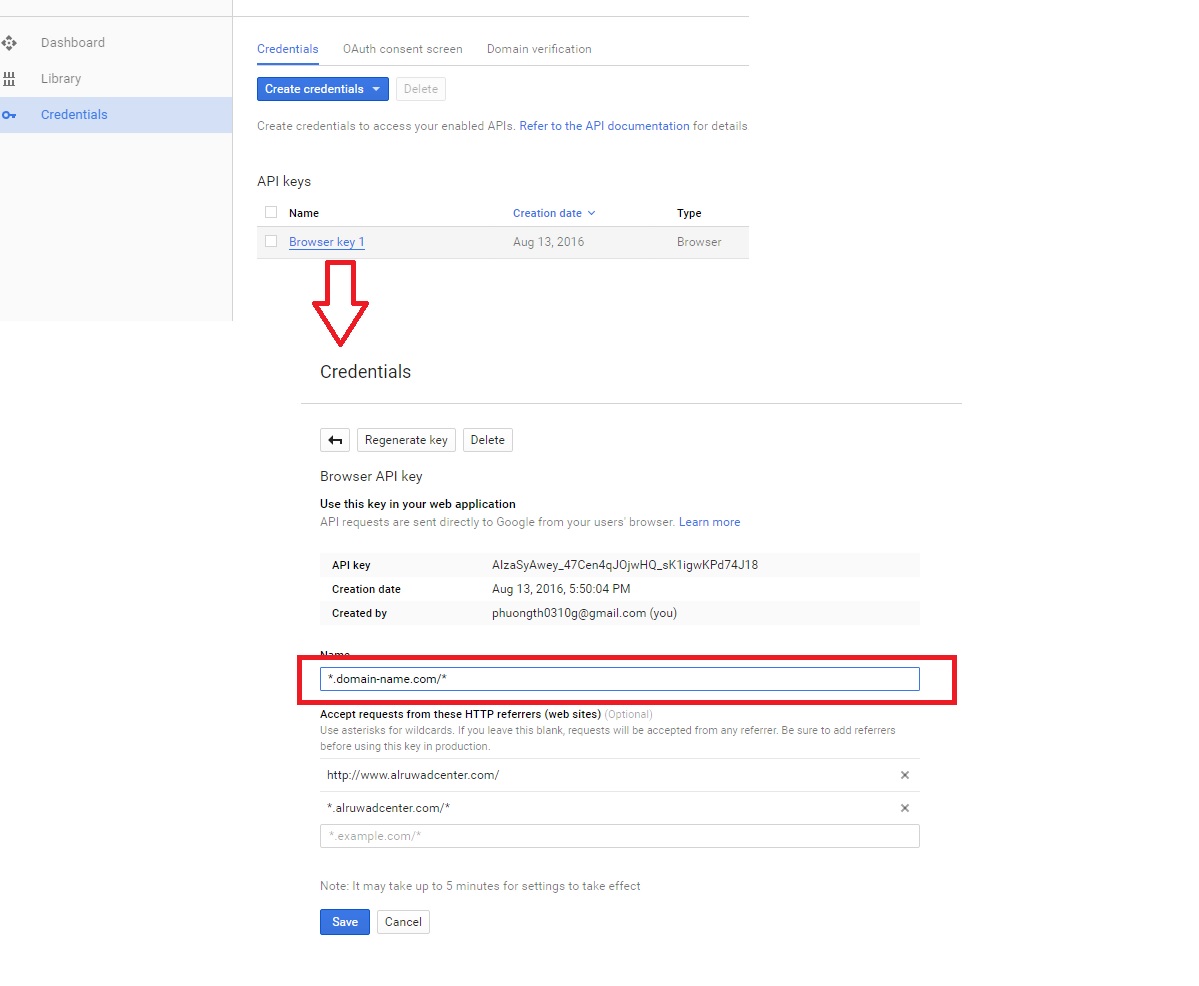
Step 3:
Step 4:
After have API key, enter it to shortcode Google Maps. In case you don’t see it, please update to latest version of shortcode, guide line here: https://support.g5plus.net/knowledge-base/how-to-update-shortcodeframework-plugins-to-latest-version/
If you have any troubles configuring your website applications with the above settings you can contact the G5Theme Support team by signing up and submit a new topic. We will be glad to assist you.
Thank you very much for choosing G5Theme!!
How can I show on my-account page all the download items in the Downloads?
NOTE: This article apply for Academia theme.
To show all the download items in the Downloads on my-account page do follow step by step to show all the download items.
1. Check woocommerce version, if version lower 2.6.1 won’t have Downloads page, need update to 2.6.1 or higher.
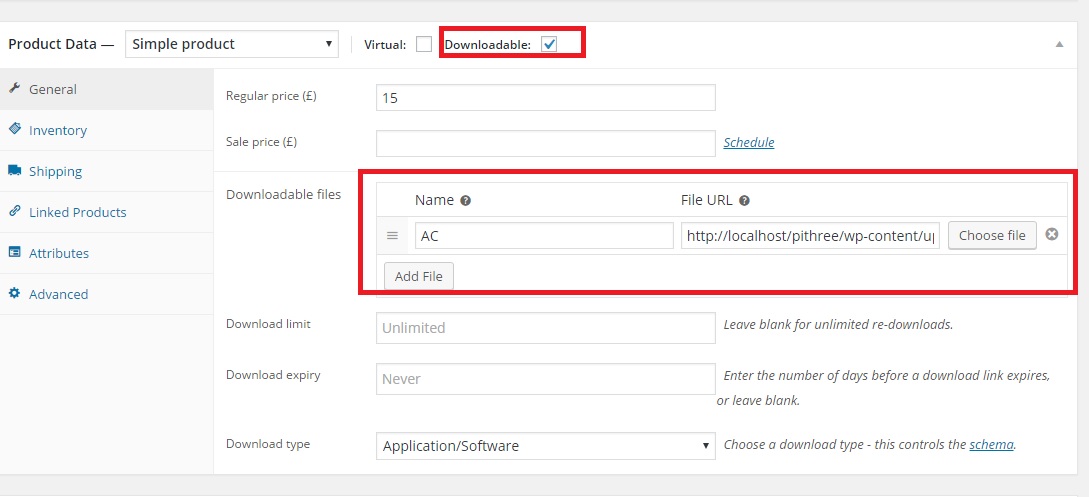
2. Setting product to downloadable
3. Grant access for downloadable products
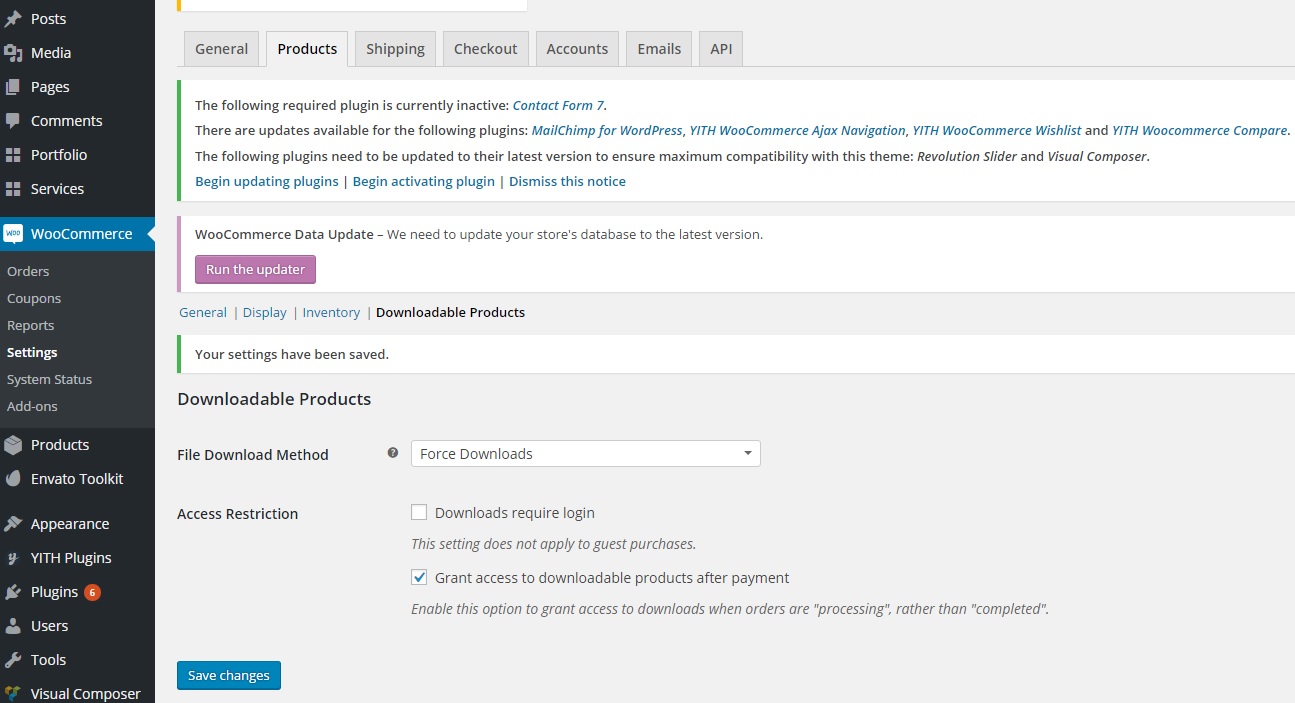
3.1 Automatically:
You need settings “Grant access to downloadable products after payment” as image:
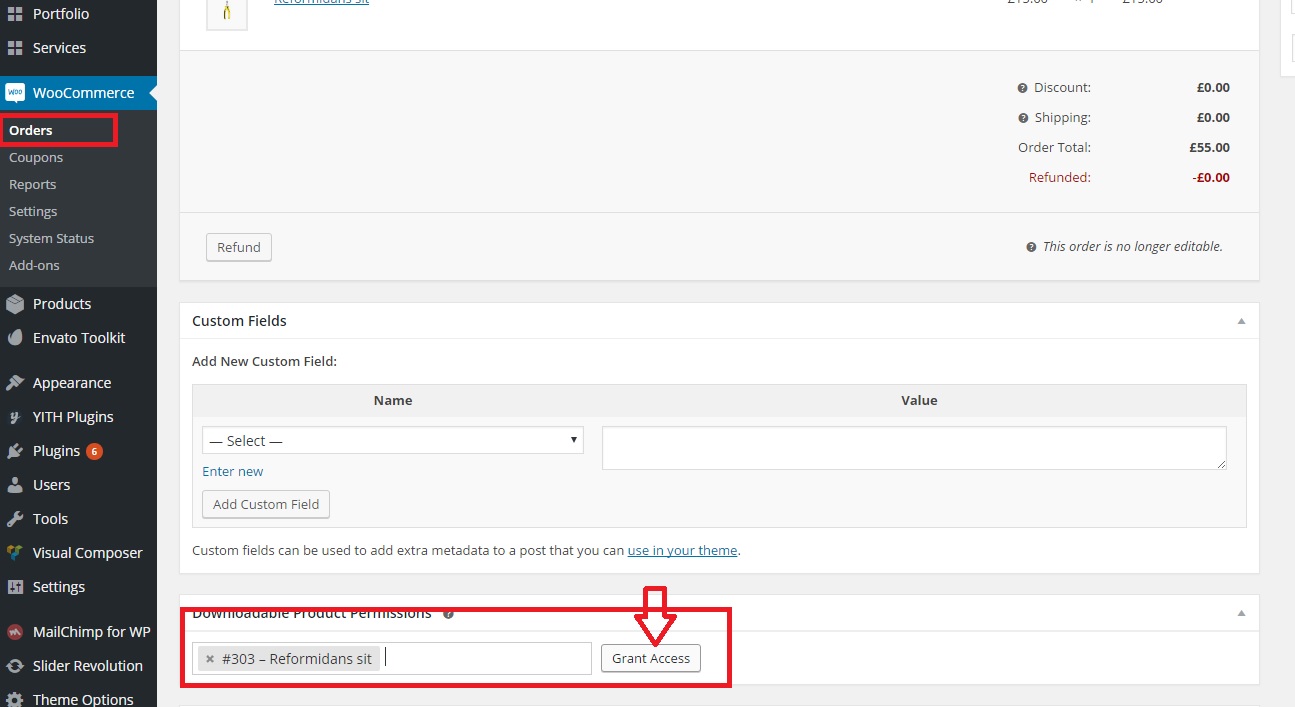
3.2 Manual:
You need un-check step 3.1, then after customers have payment order, go to order and grant access
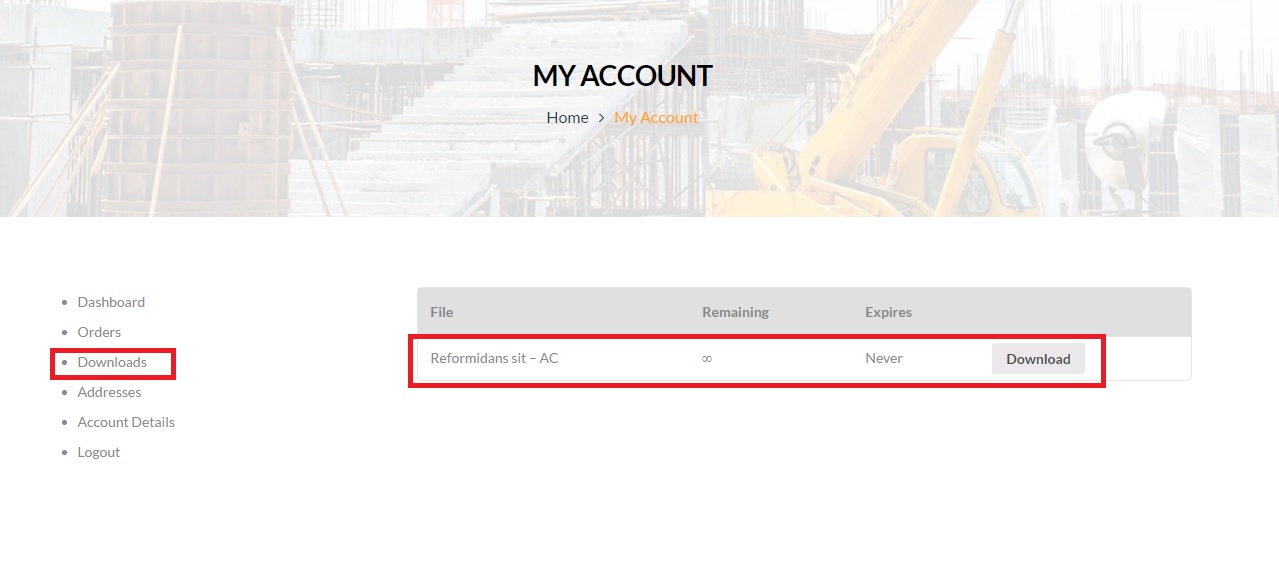
After done all steps above, go to my-account page -> tab Download will see products display look like
 That’s all. Thanks for your watching.
If you’re still having trouble upgrading your theme after reading this post, let us help! G5Theme awesome support team can help you with any issue, so please create topic or send us an email to g5plus@outlook.com
G5Theme.
How To Install Demo Settings and Demo Data
This guide do NOT uses for these theme: ZORKA, DARNA, GROVE, MEGATRON, HANDMADE, ACADEMIA, PITHREE, ORSON, RICA, ARVO, MOVECO, ORION
After installation & activated process of G5Theme theme, you can build a fully functional website just by clicking one button to install demo settings as well as demo data and you can use these templates to develop your own website.
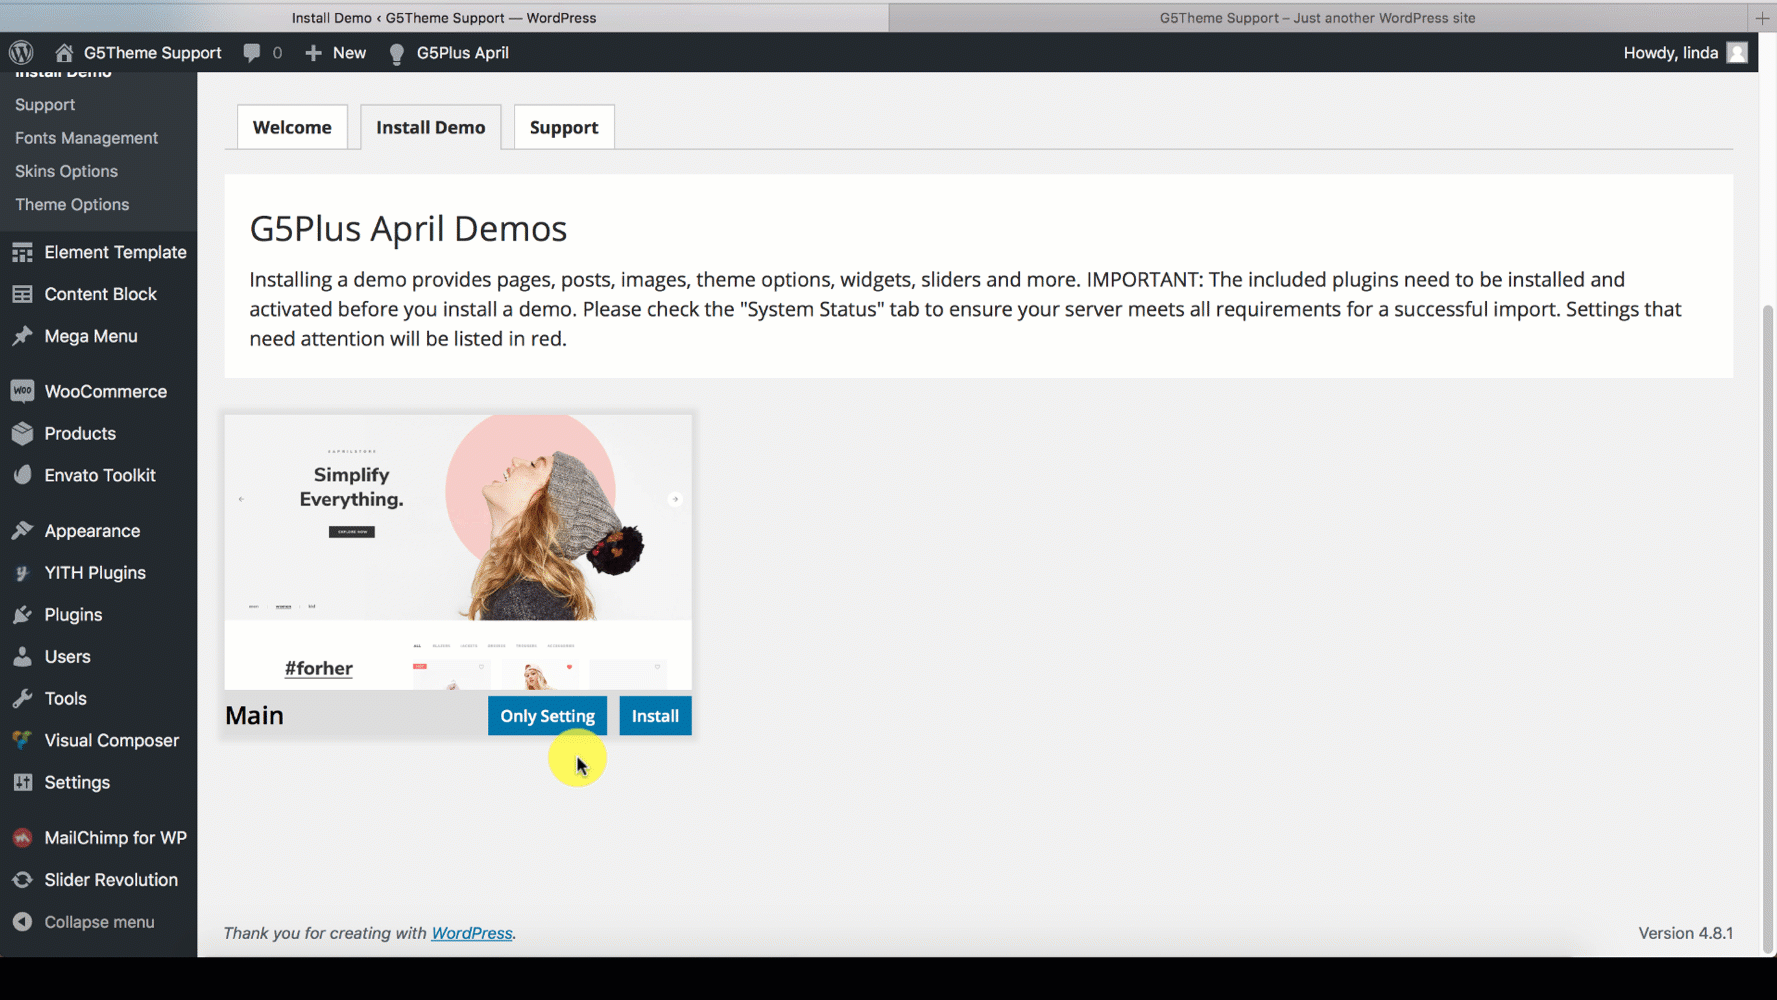
Go to G5Theme → Install Demo (To some themes such as April/Emo/Oars etc “G5Theme” section could be changed by “G5Plus-theme-name”)
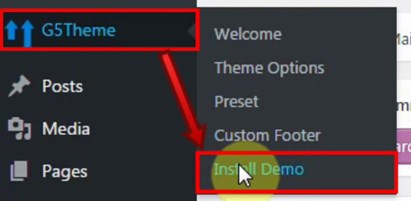
Then choose option button to install demo as you want:
- Only Setting: Click this button to install only demo settings
- Install: Click this button to install all settings with demo data of april
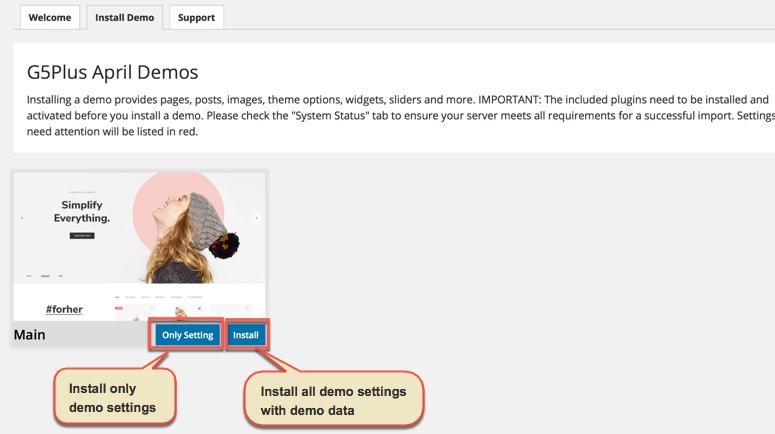
The process would be displayed on import status bars so you will know when it is finished and your data is ready.
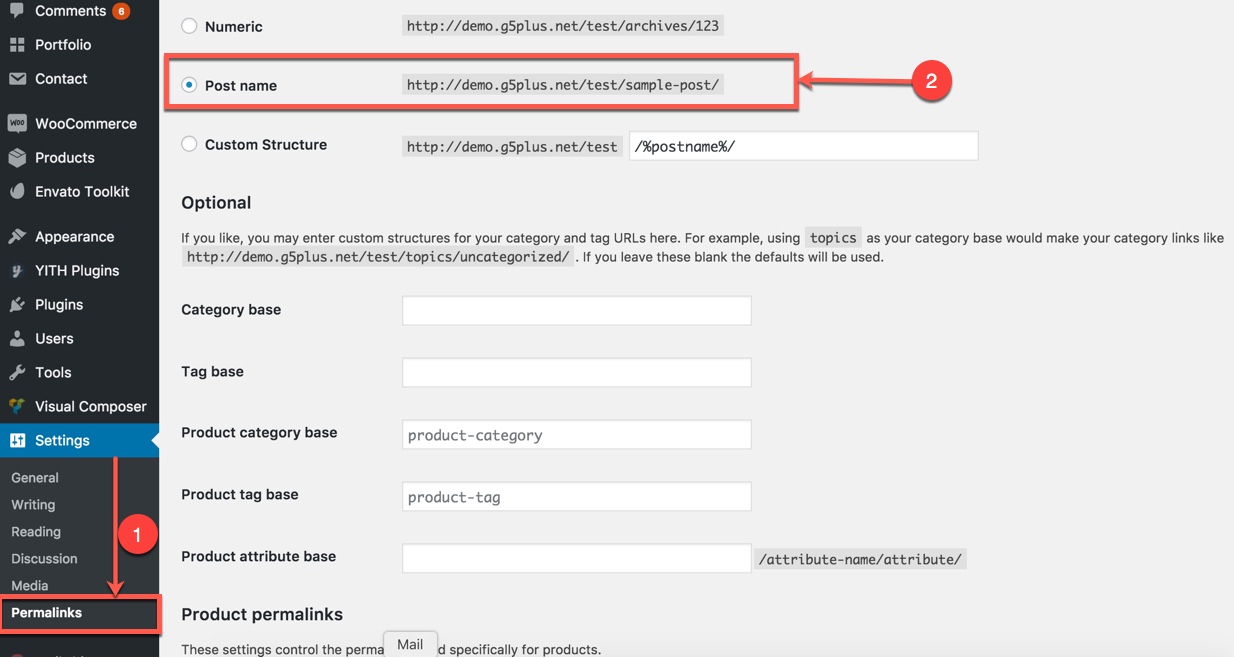
Note: Don’t forget to setup Permalinks
You can create a custom URL structure for your permalinks and archives. Custom URL structures can improve the aesthetics, usability, and forward-compatibility of your links. You should ensure that a non-default permalink setting is selected, e.g. Month and name in Settings → Permalinks .Then select Post name and click Save Change
Congratulations, you have now install G5Theme theme completely!
This video focuses on How to install Demo Settings as well as Demo Data properly on your website (the theme we used for example is MOWASALAT).
To these theme: ZORKA, DARNA, GROVE, MEGATRON, HANDMADE, ACADEMIA, PITHREE, ORSON, RICA, ARVO, MOVECO, ORION please consult this video guide on How to install an G5Theme item via WordPress and install all demo data (ex: ORSON)
——————–
If you have any troubles configuring your website applications with the above settings you can contact the G5Theme Support team by signing up and submit a new topic. G5Them Support Team will be glad to assist you.