How to create a multilingual WordPress website

By default, WordPress does not come with features required to create a proper multilingual site, but G5Theme offers WordPress themes that all are compatible with multilingual plugins. If you want to build an e-commerce site that will serve a diverse community that speaks multiple languages, then you don’t have many choices. You can use free plugins such as Polylang, qTranslate etc or use a premium plugin like WPML.

We strongly suggest using WPML since it’s the most complete solution for creating a multilingual WP website.

Configuration

After installing and activating the WPML, then you should configure it, the wrong configuration can create many problems for your website so please configure it with caution. We suggest to read this article carefully and proceed with its instructions: How to Create a Multilingual WordPress Site with WPML

Also, you can check WPML official guide for language configuration: WPML Language Setup

Translating

After configuration, then you need to start translating your website contents. Please check the following articles for each section.

Translating Posts/Pages

Translating Categories/Tags/Custom Taxonomies

Translating Menus

Translating Widgets

Translating Strings

Anything that doesn’t fall inside posts, pages or taxonomy goes into String Translation. This includes the site’s tagline, general texts in Admin screens, widget titles and many other texts.

Language Switcher

After translating your website contents, then you should place a language switcher into your website so visitors can simply choose their desired language. Also, you may check language switcher options to achieve your desired style.

Here is our guide on how to translate language on our theme: https://support.g5plus.net/knowledge-base/how-to-change-language-in-g5theme-using-loco-translate-plugin/

Hopefully that this article could give you more details on how to create a multilingual site that used our premium WordPress themes. If you have any questions or concerns, don’t hesitate to let us know by leaving a topic in our support forum. Thank you very much!
 

How to Update the Revolution Slider/WPBakery Page Builder plugin

We don’t provide license key of the premium plugin (WPBakery Page Builder or Revolution Slider) in the download package, thus you can’t find it in your package downloads (We bought the extended license of this plugin, for more details in Term & Policy here: https://codecanyon.net/licenses/terms/extended) It means that when these premium plugins are packaged with our themes:

  •  Support is limited
  • Auto-updating functionality is not included

However, don’t worry! We will update our themes to run follow WPBakery Page Builder/Revolution Slider updates. This guide will cover how you can update the Slider Revolution plugin (similar to WPBakery Page Builder plugin)

Note: DO NOT uninstall/reinstall the plugin, as that would also delete your previously built sliders. Please follow this instruction to save previously built sliders once the update process is complete.

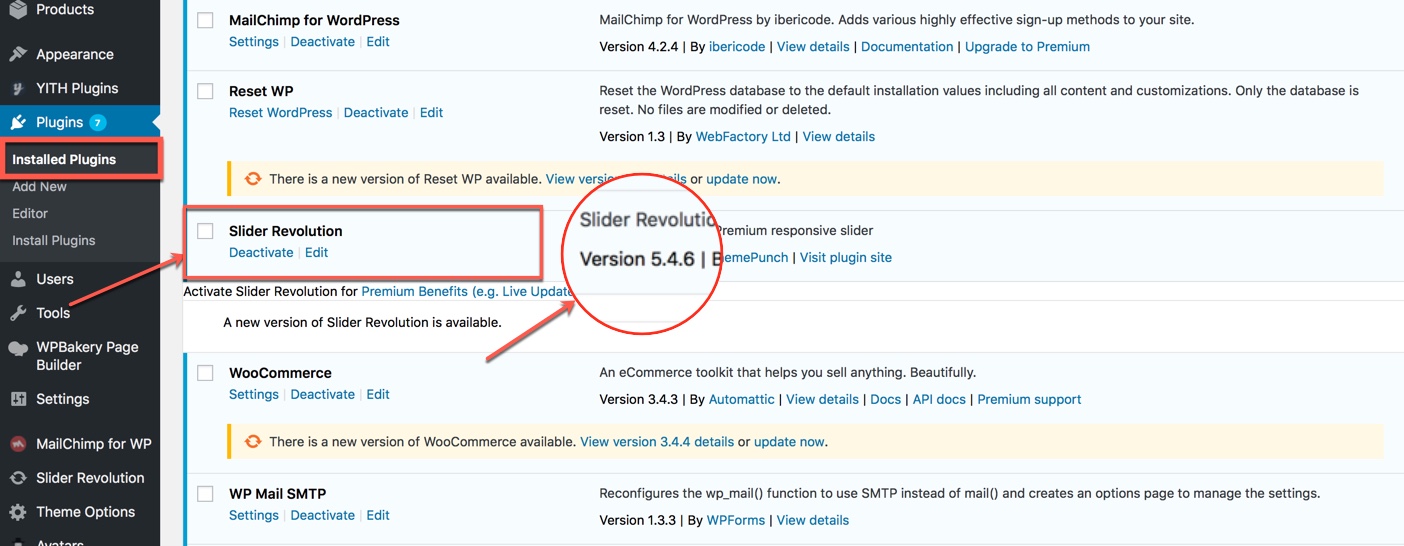
1. Find the version of the plugin you’re currently using that is the latest version or not

update-1

Then find the copy of the latest version of the plugin from here: https://support.g5plus.net/forums/topic/download-revolution-slider-visual-composer/ (You have to login/signup to our site by verifying your purchase code to see the links)

2. Using FTP program to update

Navigate to the following directory: wp-content/plugins/ and change the file named revslider to be revslider-old
And then upload the folder named “revslider” folder that can be found inside the zip file you downloaded from us.

download

Finally, delete the old folder that has been renamed.


If you have any troubles configuring your website applications with the above settings you can contact the G5Theme Support team by signing up and submit a new topic. We will be glad to assist you!

How to Create Page Using Visual Composer Shortcode

This video focuses on How to Create Page Using Shortcode (by Visual Composer) properly on your website.

G5Theme item includes several page templates to choose from, allyou need is installing Demo Data to choose the page template that suits your needs. With G5Theme item, you can create counless pages with content as your liking.

Step 1 – To add a new page/post to your WordPress site, login to your Dashboard and navigate to Page/Post>> Click Add new. The WordPress page editor looks nearly identical to the post editor, except for a few different boxes located on the right side of the screen

create-a-new-page-02

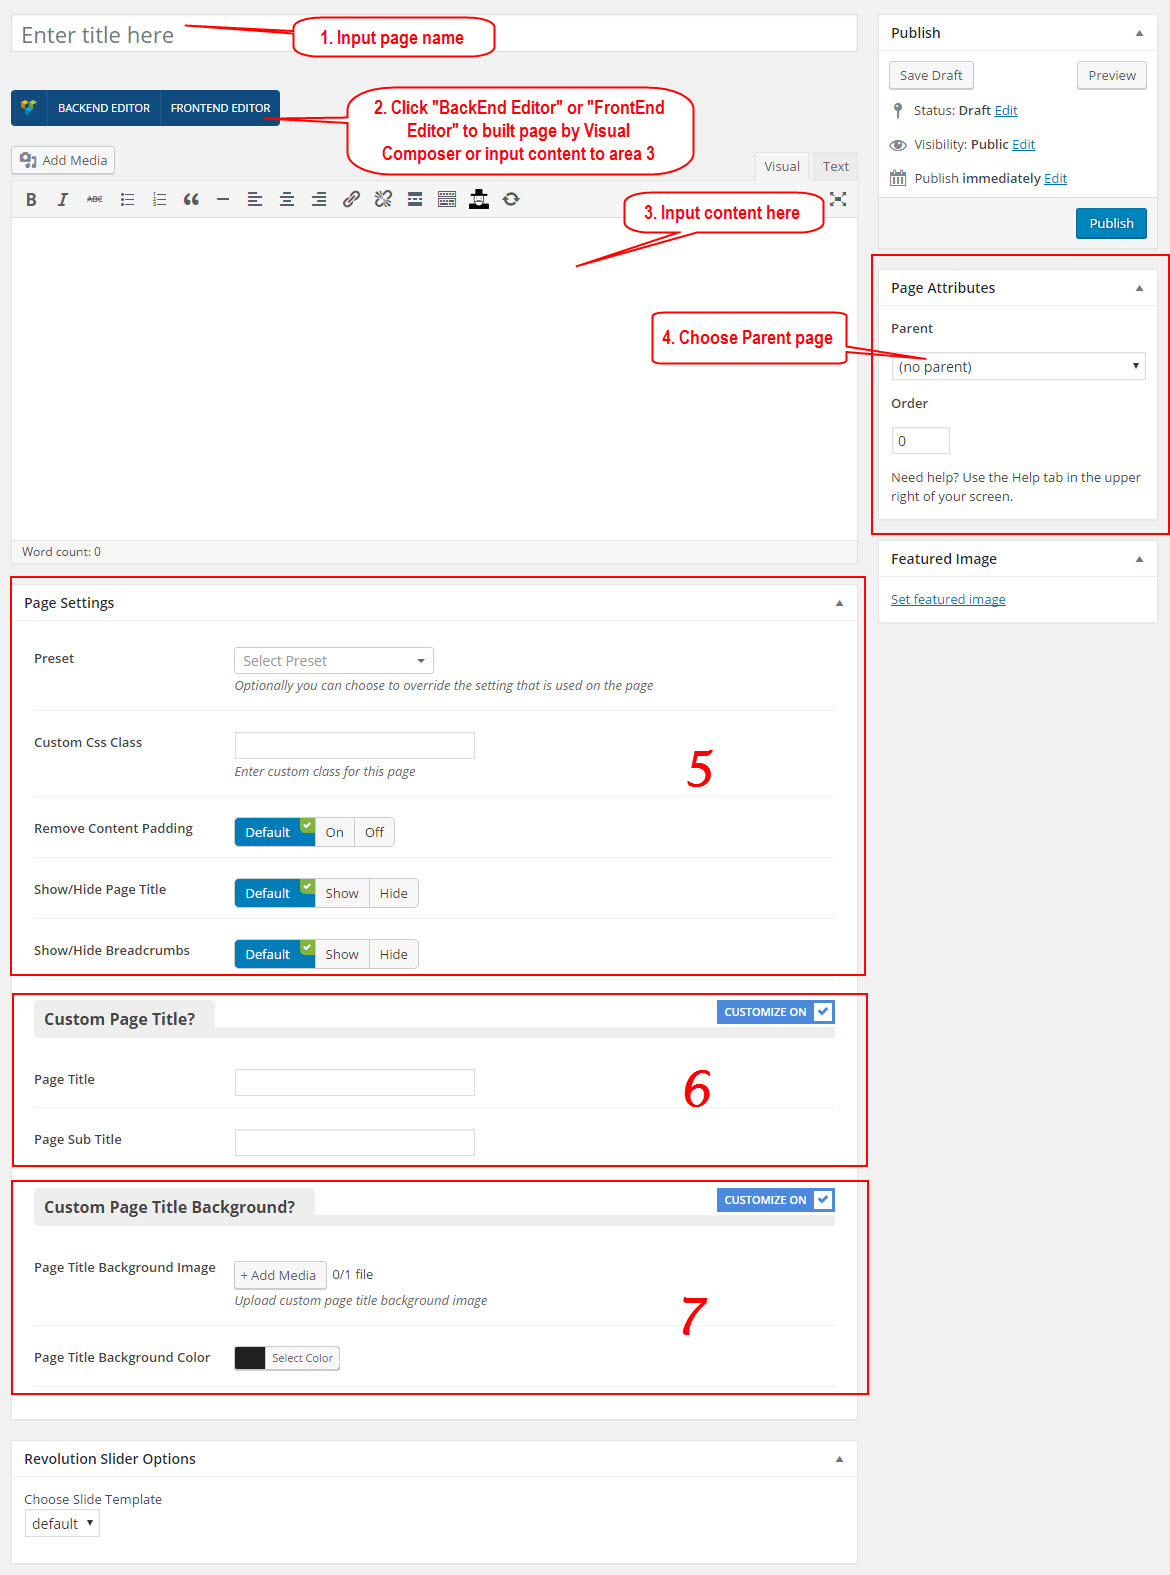
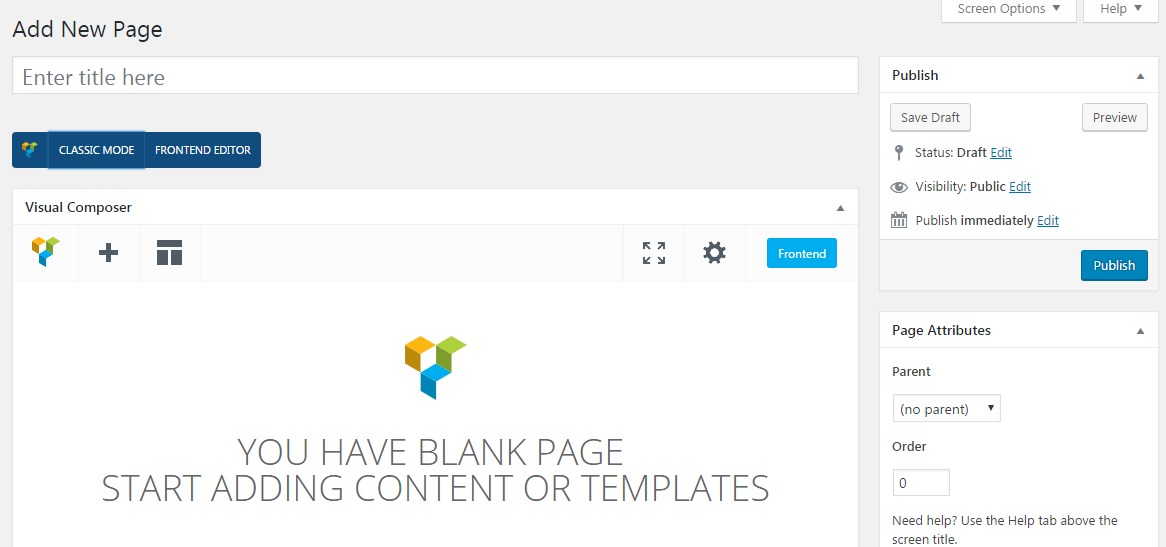
Step 2 – Input a new name for your page, and click “BACKEND EDITOR”(must installed Visual Composer plugins) to create page by Visual Composer

create-a-new-page

Step 3 – Input a new content for your page.

Step 4 – Set your Parent page. It’s normally set to No Parent.

Step 5 – Choose setting for this page.

Step 6 – Custom Page Title

Step 7 –Custom Page Title Background

Next, you can publish this page and set it as your frontpage in the WordPress Settings panel.

If you have any troubles configuring your website applications with the above settings you can contact the G5Theme Support team by signing up and submit a new topic. G5Them Support Team will be glad to assist you.

How To Change Language in G5Theme Using LOCO Translate Plugin

Themes that support multi-language is not an automatically translate content function, it is the feature that allows us to write more than one language on the website.  It means that you have to translate the phrase in theme and plugins into many different languages by yourself.

Translating using Poedit

First of all, you will need to download .PO/.pot file editor like Poedit or other. It is possible to use any text editor but it will be so much easier to use Poedit than regular text edit so I strongly recommend to download it. It’s free, works on Mac, Windows, and Linux and there is no reason not to use it.

I had an article on How to change languages via po/mo file which makes it easier to use Poedit to translate G5Theme  into your own language.

Translating using LOCO Translate plugin

We hope you find out how to translate a WordPress theme and now can give back to the community by translation themes and plugins for others to use. G5Theme proudly provides Premium WordPress themes with over 5000 satisfied users every year and we hope you will do that with theme translations as well.

How to speed up website by WP-Rocket & Cloudflare with our theme

This article is our guide line for configuration WP Rocket(http://wp-rocket.me/) plugins and Cloudflare (https://www.cloudflare.com) with free package. Both of them are used on all my theme. Now, let get started.

This article is our guide line for configuration WP Rocket (http://wp-rocket.me/) plugins and Cloudflare (https://www.cloudflare.com) with free package. Both of them are used on all my theme. Now, let’s get started.

1. Config for WP Rocket, do follow:

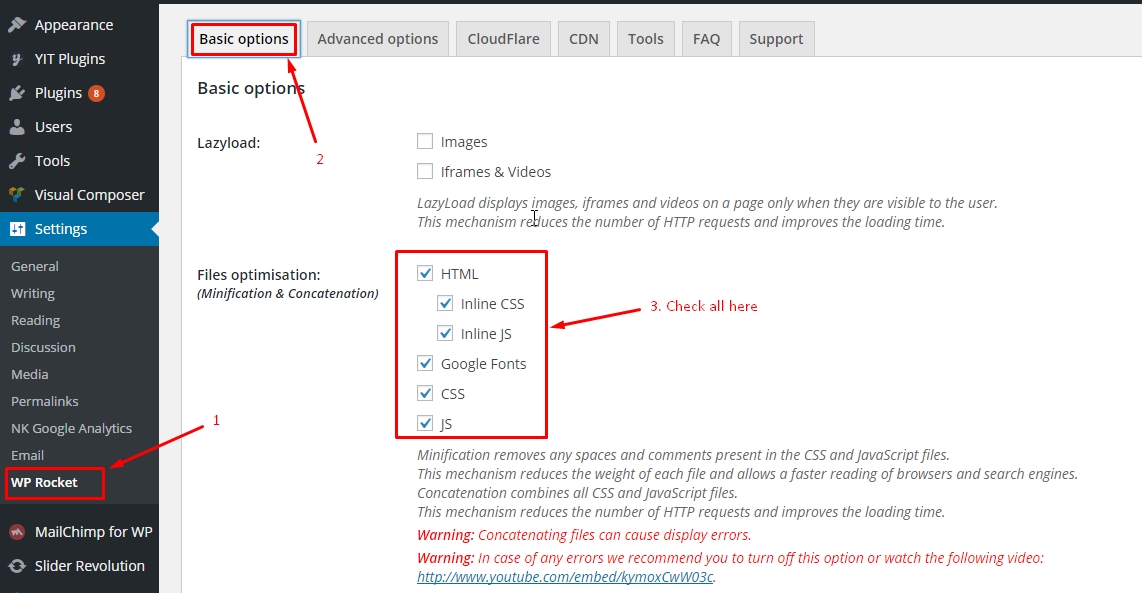
1.1 Config tab “Basic Options”
wp-rocket-setting-01

Next to:
wp-rocket-setting-02

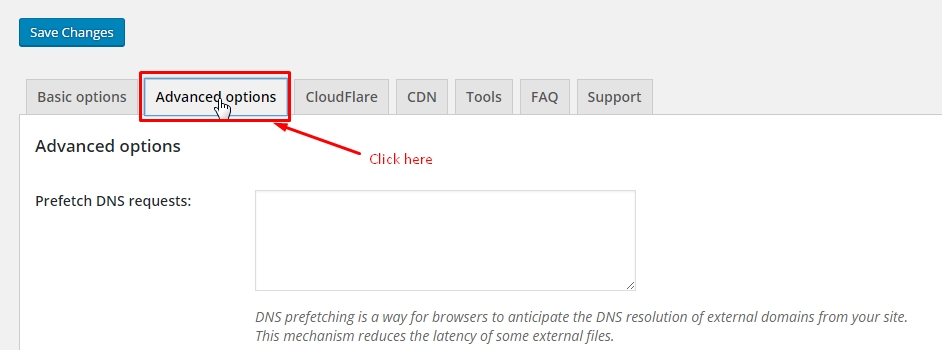
1.2. Config “Advanced Options”:
wp-rocket-setting-03
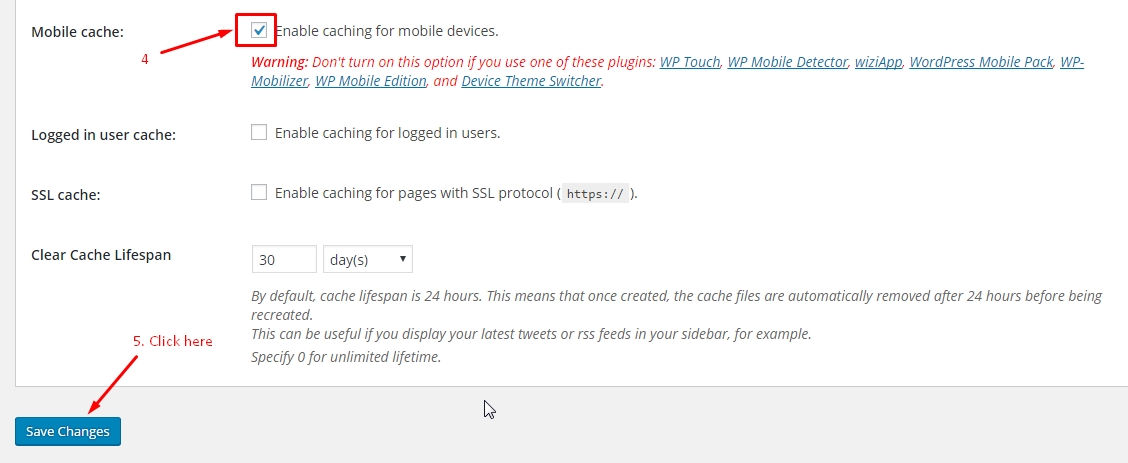
Then scroll down to check as image below. Then click “Save Changes”
wp-rocket-setting-05

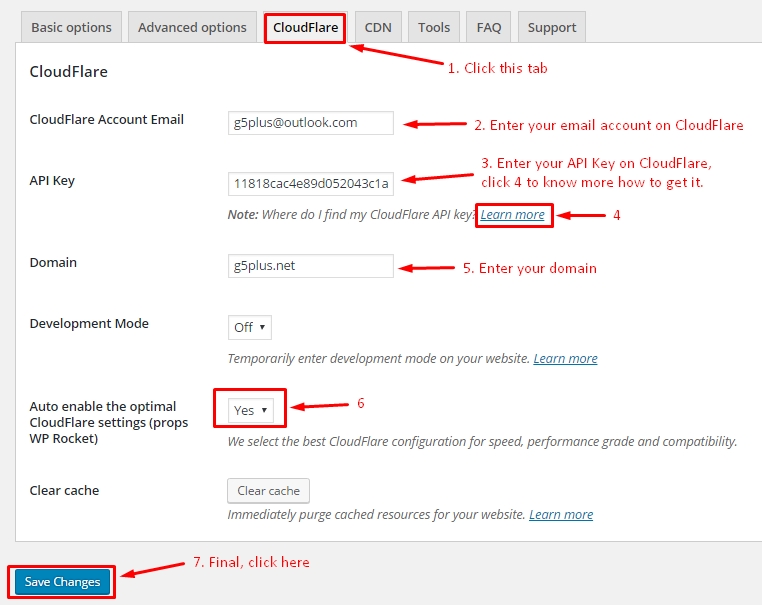
1.3. Config tab “CloudFlare”, if not exist, go to 1.4:
wp-rocket-setting-06

1.4. Config “CDN”:
wp-rocket-setting-07

After all step above done, click “Save Changes” button.

2. How to config CloudFlare account:

2.1. Integrated DNS’s your domain to CloudFlare.
Login to account manager domain then change/point DNS value to DNS cloudflare’s server. In case you don’t know what to do, please contact domain provider.
With my domain, point to:
john.ns.cloudflare.com and wally.ns.cloudflare.com view here:
wp-rocket-setting-08

2.2 Add DNS your domain to DNS cloud’s server.
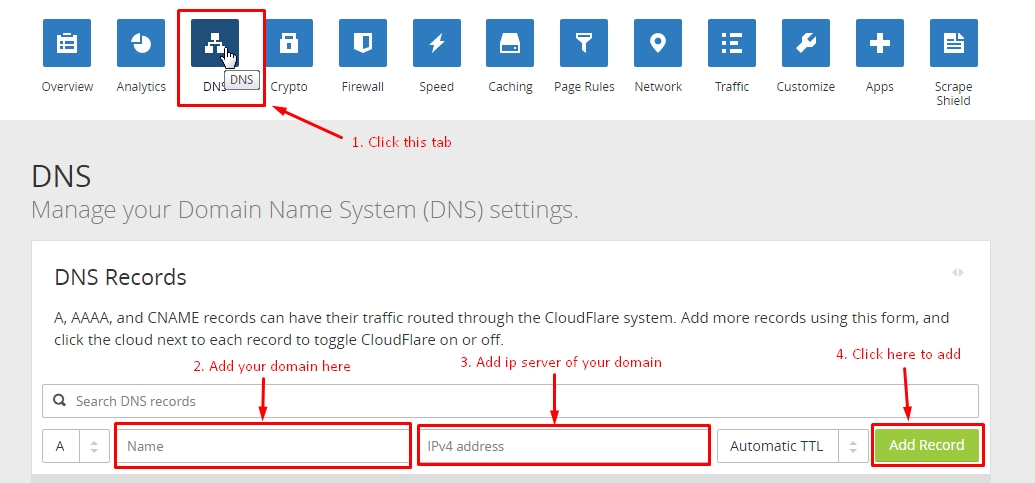
Login to cloudflare then go to DNS tab
wp-rocket-setting-09
Result as below(example) is ok. In case color of “cloud icon” is grey => not correct, you must click on “cloud icon” to change.
wp-rocket-setting-10
Hopefully this guide is helpful to you.
—————————————

If you have any troubles configuring your website applications with the above settings you can contact the Support Center by signing up and submit a new topic. G5Theme Support Team will be glad to assist you.

How To Update/fix WooCommerce Out Of Date

In this article, we will show you How to update/fix WooCommerce out of date.
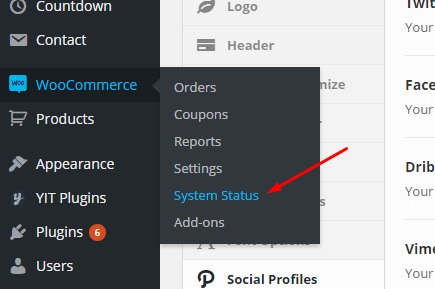
– To check if there are any updates available for your website, you can go to WooCommerce > System Status

woocommerce1
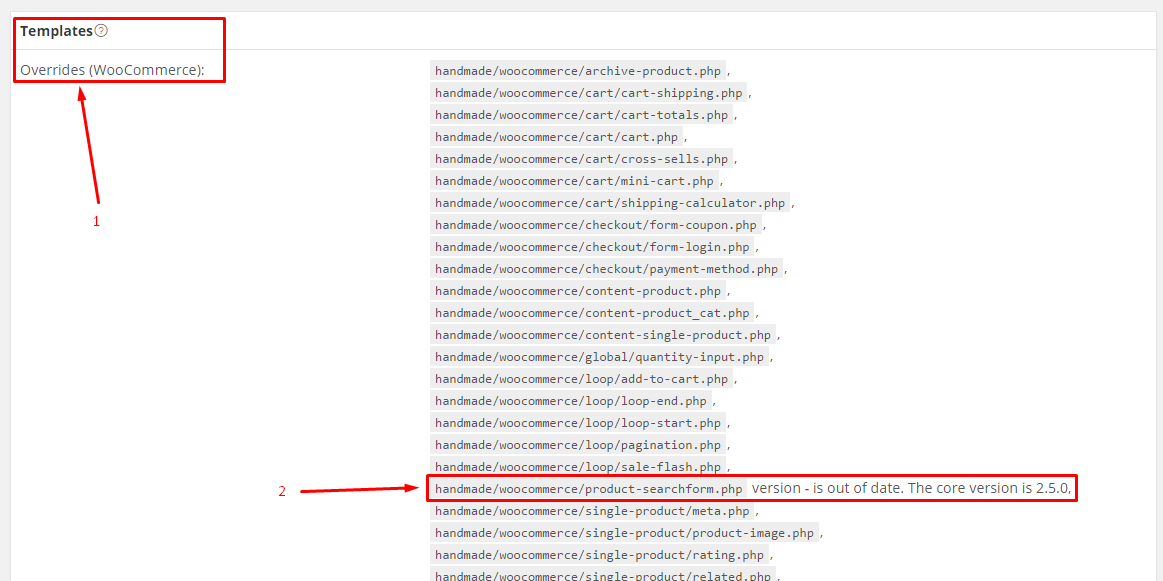
– Scoll down to Templates, then find exactly find had warning on your hosting/server, for example:

woocommerce2
In above image, the path is handmade/woocommerce/product-searchform.php

– Open this folder, then edit/change value below to lastest version as you want:

woocommerce3

You can also refer more from documentation of WooCommerce author here: https://docs.woothemes.com/document/woocommerce-self-service-guide/

If you’re still having trouble upgrading your theme after reading this post, let us help! G5Theme awesome support team can help you with any issue.
Thank you very much for choosing G5Theme

How To Update Shortcode/framework Plugins To Lastest Version?

On each theme, we have a special plugin name: themename-framework, such as with MEGATRON: megatron-framework, with DARNA: darna-framework…and respective.

Without these plugins, the theme won’t work properly. When update theme to version higher, you need to update this plugin to ensure that you don’t run into any compatibility issues with the latest version of G5Theme.

update-framework1

Update framework notice

Note: This manually update shortcode/framework just apply for these items: HEARTSTONE, ACADEMIA, MEGATRON, HANDMADE, WOLVERINE, DARNA, INNOVATION, GROVE, ZORKA, CUPID (This is not updated for XMENU)

Step 1 – Deactivated current plugin and delete it on your website (delete it and all files current)

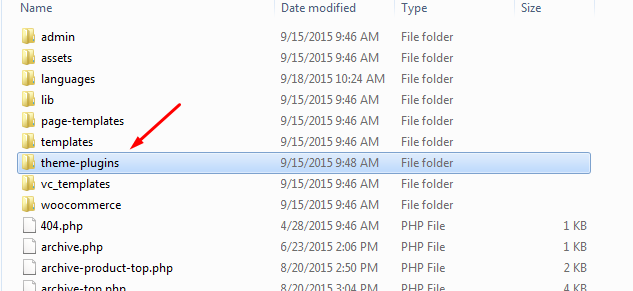
Step 2 – Download G5Theme package (latest version from ThemeForest) and extract it. Find theme-plugins folder on path: [root_G5theme]\theme-plugins\

update-framework3

Update-framework

For example with MEGATRON theme, path: megatron/theme-plugins, you will see megatron-framework.zip file.

– Re-install plugins/framework by upload file.

After Updating

After you are done updating your theme please also perform the following steps:

  1. Clear your Site & Browser Cache

Whenever you update ANY plugin, theme or WordPress you must clear your browser and site cache to help avoid any potential cache-related bugs.

  1. Updating WPBakery Page Builder

After you update your theme please make sure to update your WPBakery Page Builder plugin as well following the guide for updating the theme’s recommended plugins. If you update the theme and not the WPBakery Page Builder you may run into issues (Please consult this GUIDE)

Fix Issue Shortcode When Update Visual Composer 4.7 or Higher

Hi,
Visual Composer update to version 4.7 or higher have some significant transforms, so G5Theme shortcode (on Grove) had been affected abit, so we have to fixed it for next update version.
Please follow these steps as below to fix it asap:

1. Download grove-shortcode
2. Deactive plugins grove shortcode, delete all files, then re-install

Done.

————
If you have any troubles configuring your website applications with the above settings you can contact the Support Center by signing up and submit a new topic. G5Theme Support Team will be glad to assist you.
Thank you very much for choosing G5Theme!

Where do I find Visual Composer License Key?

We don’t provide license key of Visual Composer in download package, you can’t find it in your package downloads. Visual Composer (We bought extended license of this plugin) but current have note solution for activate with this plugin. license key only can activate 1 time 🙁
We created new ticket on http://support.wpbakery.com/ and here is the answer from developer of Visual Composer

It is not possible for theme buyer to activate the license (and hence to auto-update the Visual Composer) as they have not purchased the license directly from us, but has received it in-directly from the theme. In this case, you must update the version in the theme and must release a theme update which the buyers can download and hence in-turn will receive the latest version of Visual Composer.

We’re sorry about this inconvenience but we will update our themes to run follow Visual Composer updates.

I bought Extended license for all my items(theme), read more here: https://codecanyon.net/licenses/terms/extended

Review Standard license: https://codecanyon.net/licenses/standard

Please read Bunded Plugins here: https://help.market.envato.com/hc/en-us/articles/213762463-Bundled-Plugins

Thanks & Hope all customers know that.