How to Change Text and Link of Custom Text in ORION

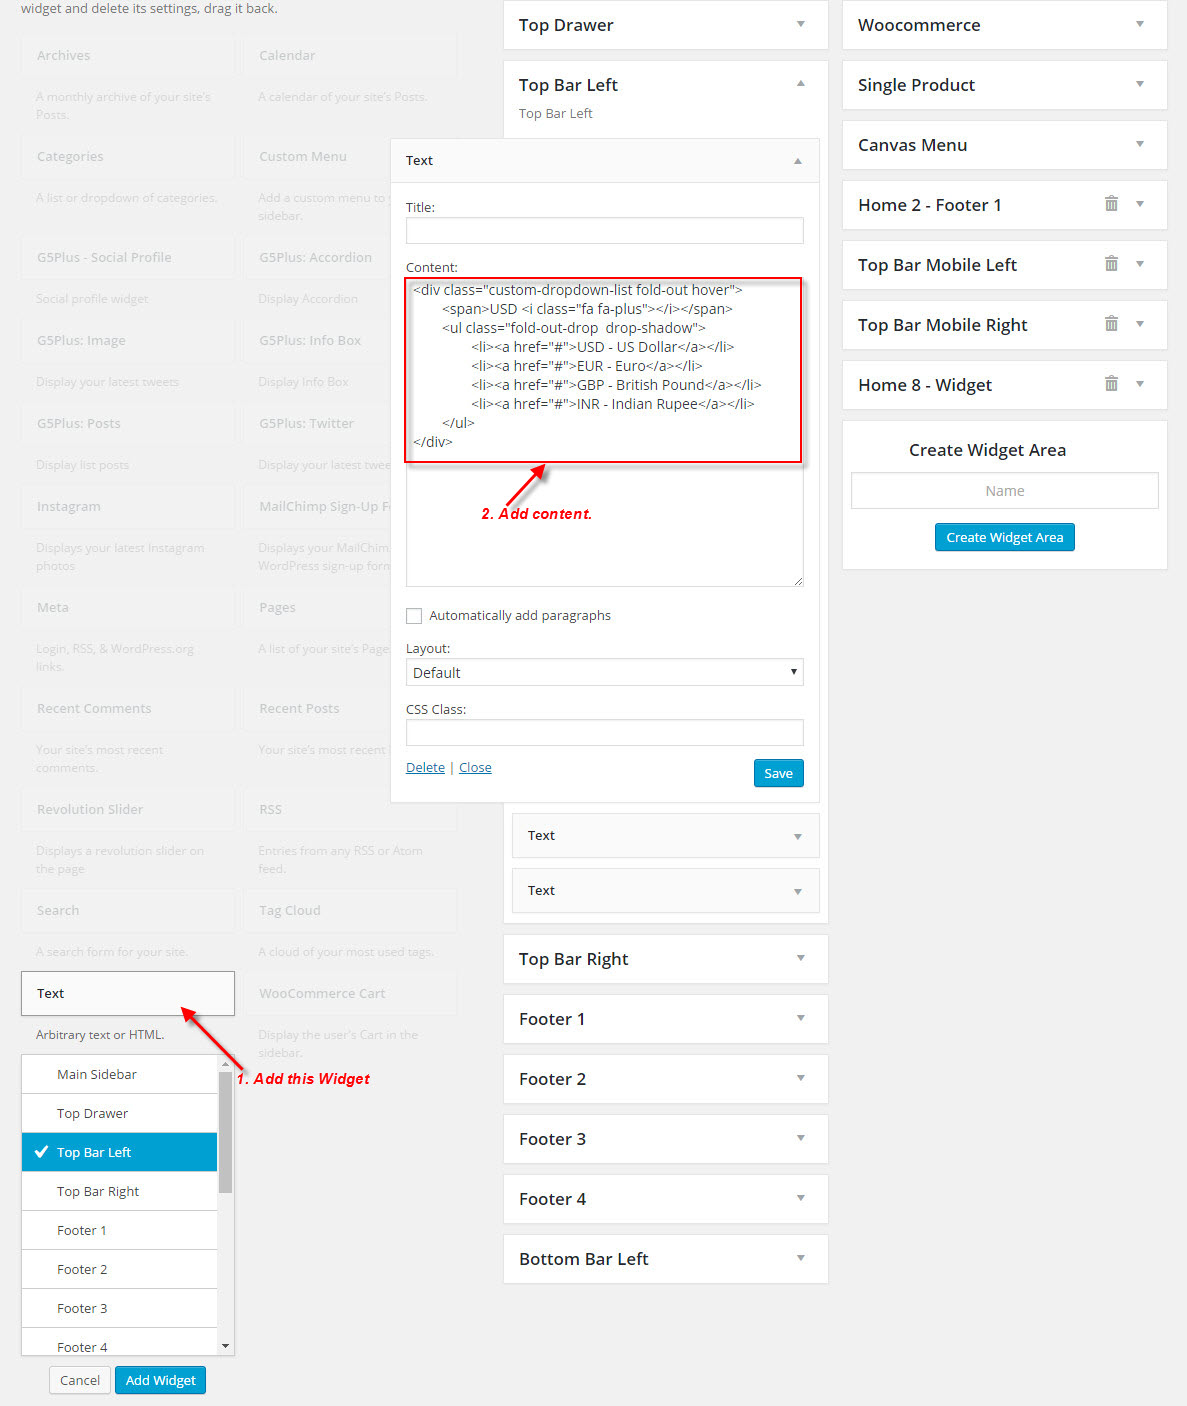
Custom Text function is extra Header Area building option in ORION. For example, Custom Text has been used for APPOINTMENT button in Home Creative Agency 01  (This Homepage is applied Home Creative Agency Preset).

orion-custom-text

In this article we will explains How to use Custom Text properly on your website.
This video focuses on showing you How To Change Text and Link of Custom Text on ORION theme.

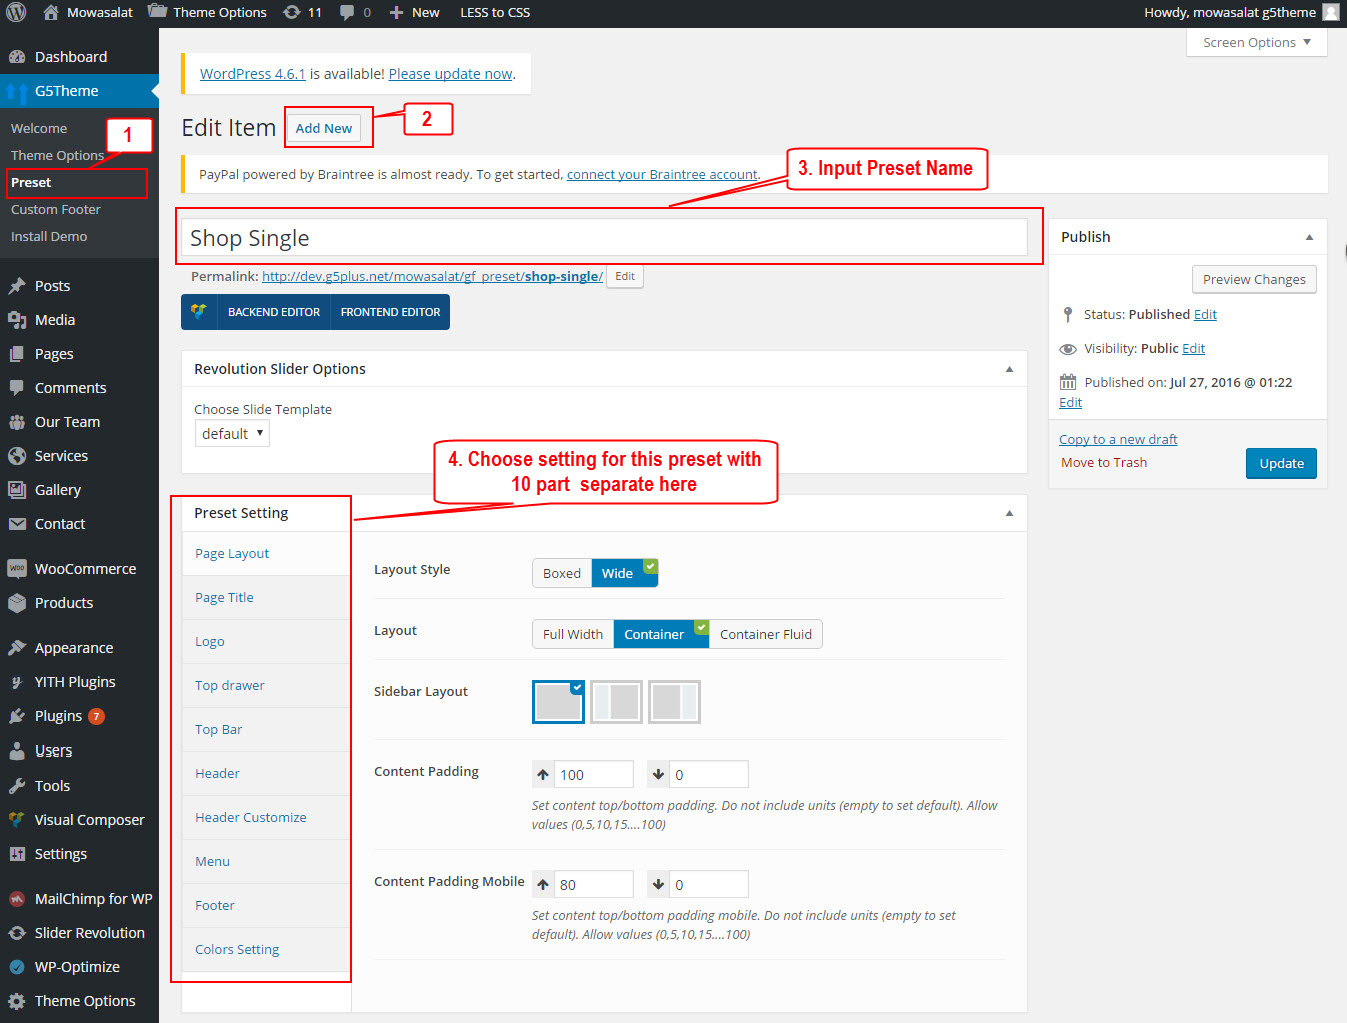
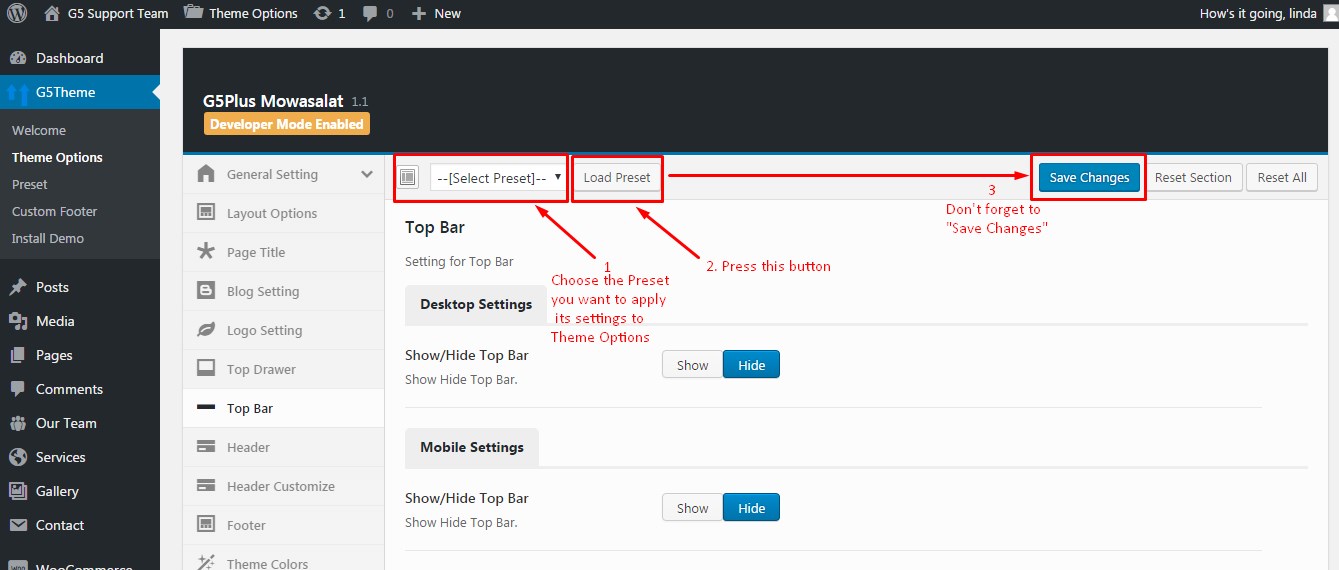
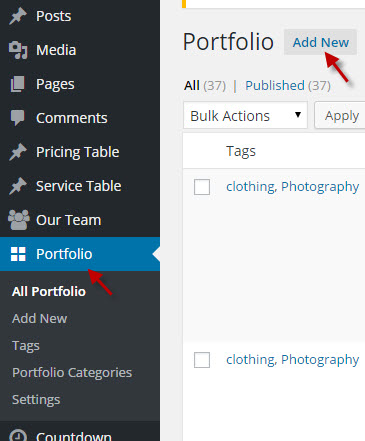
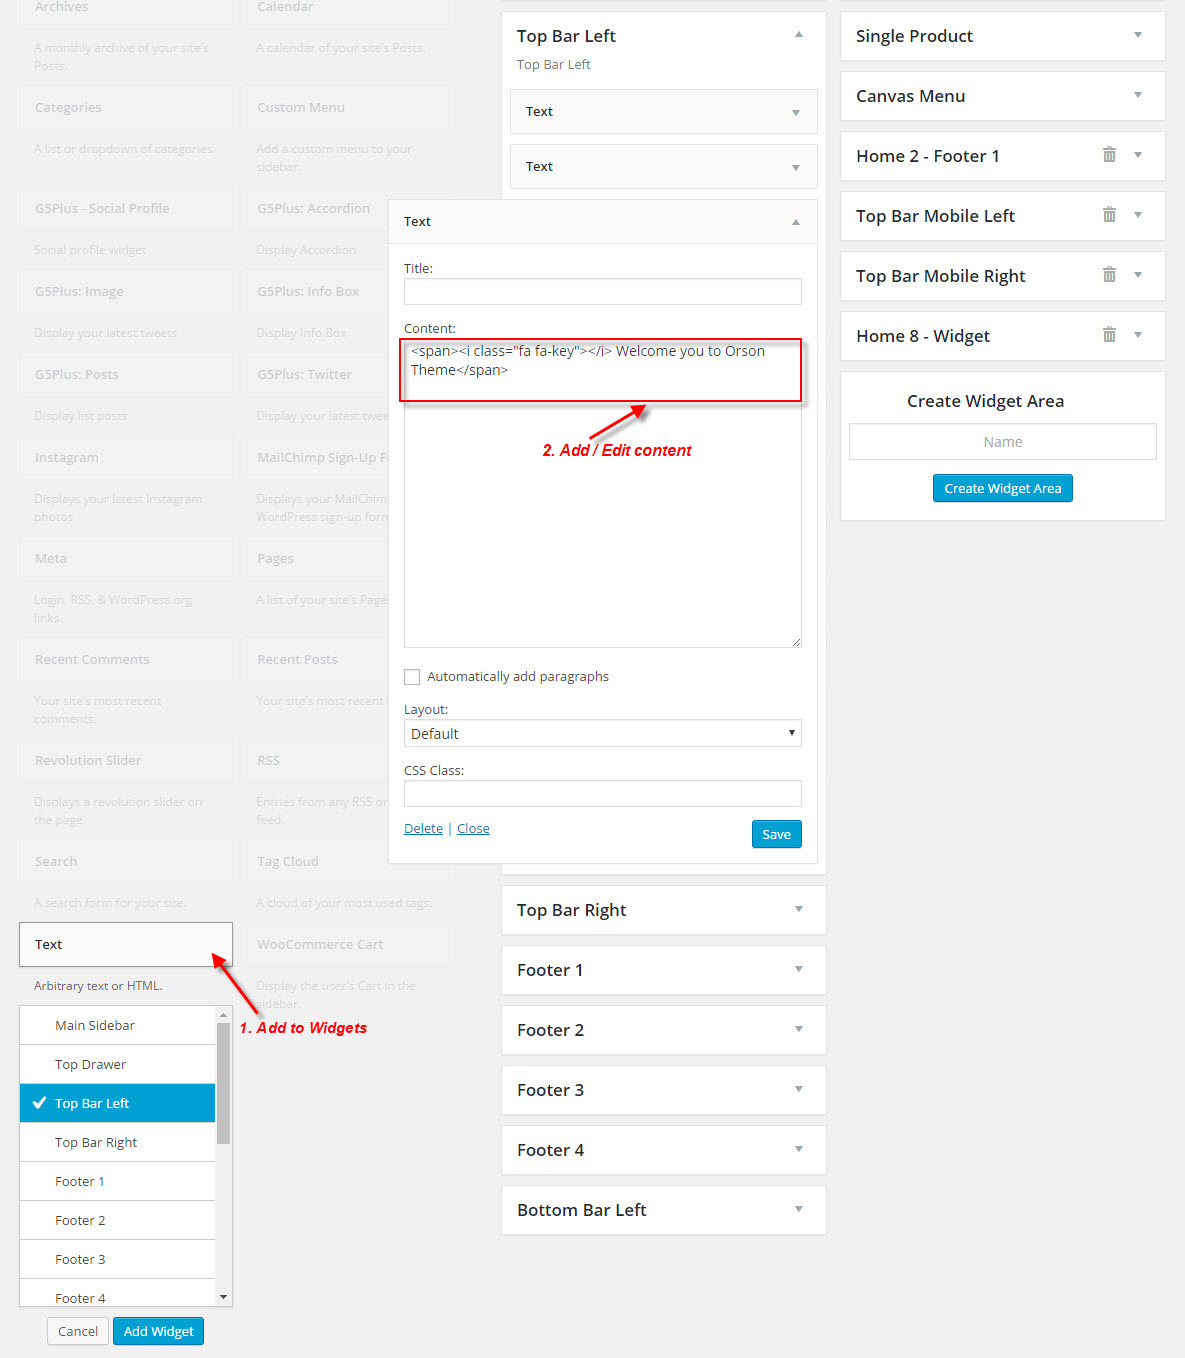
1. Use Custom Text in Preset

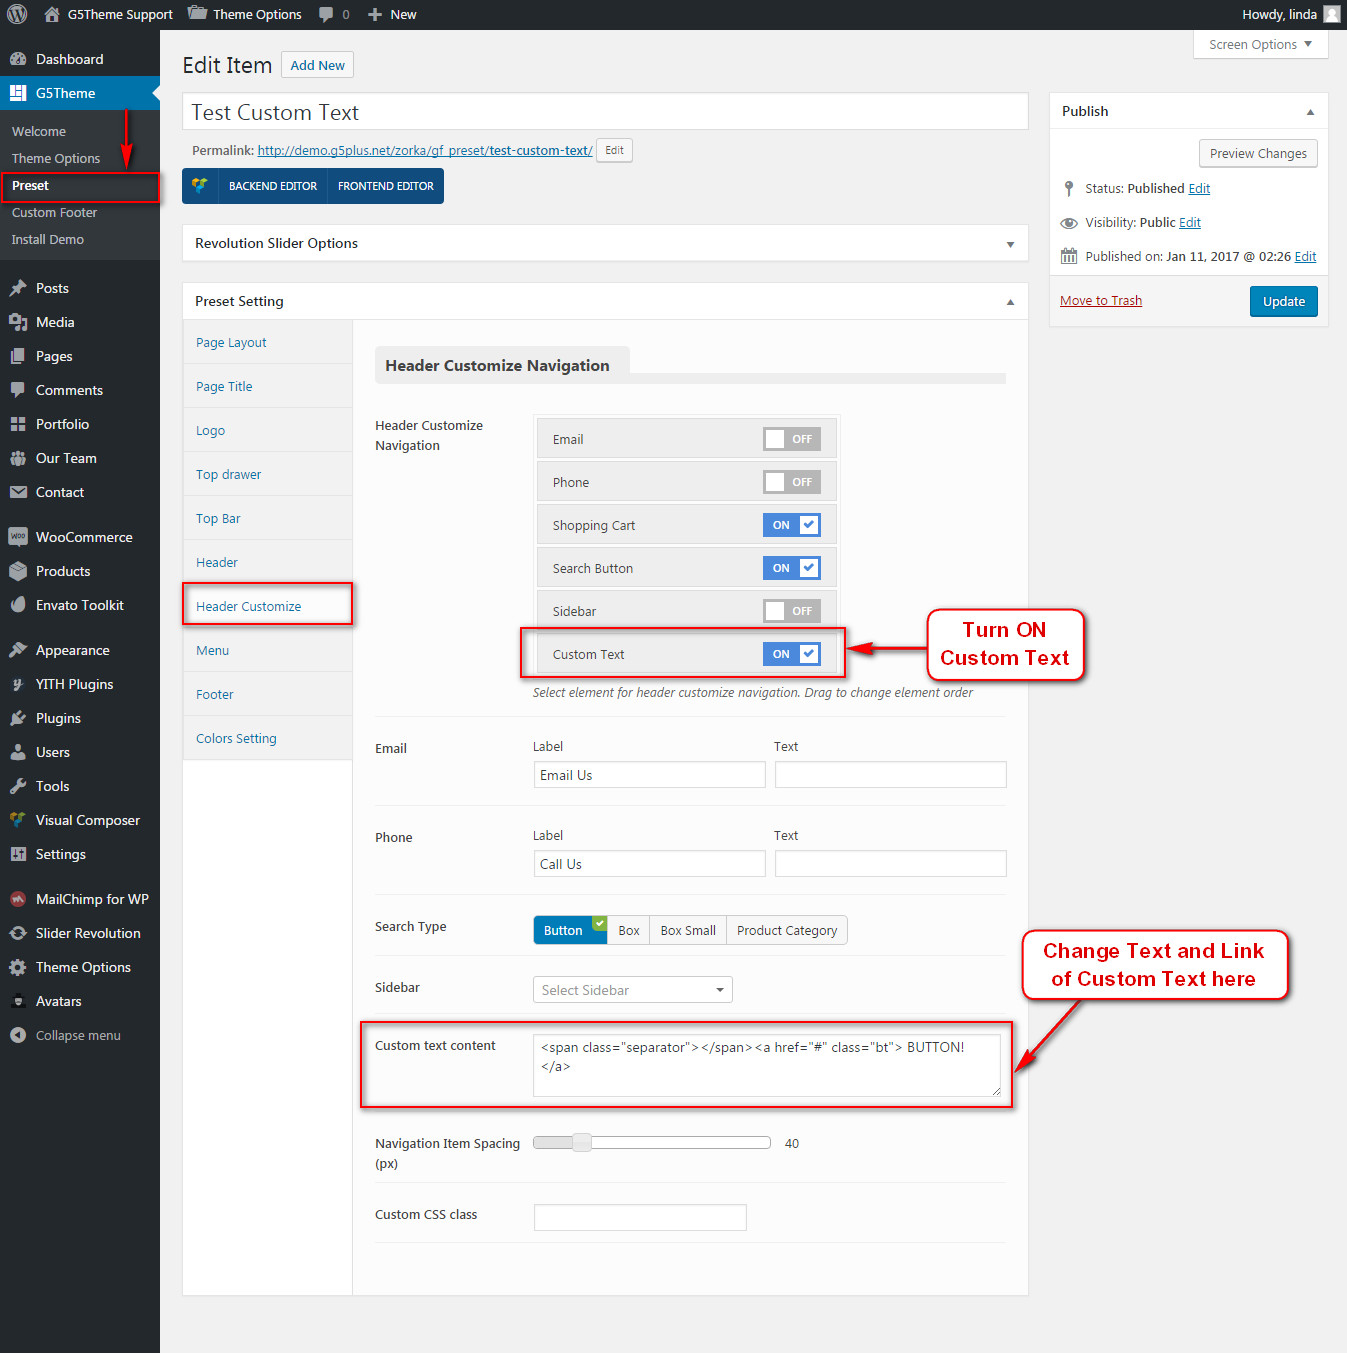
Below is a screenshot of the Header Customize option in Preset Settings, we can select elements for Header navigation by turning On/Off button in each element and Custom Text as well (in below image we set ON Custom Text), that means on any page apply this preset, you are overriding the same global theme option and your Custom Text will be displayed.

Then you can easily change text and link of Custom Text button in the Custom Text Content box as your liking.

orion-custom-text-2

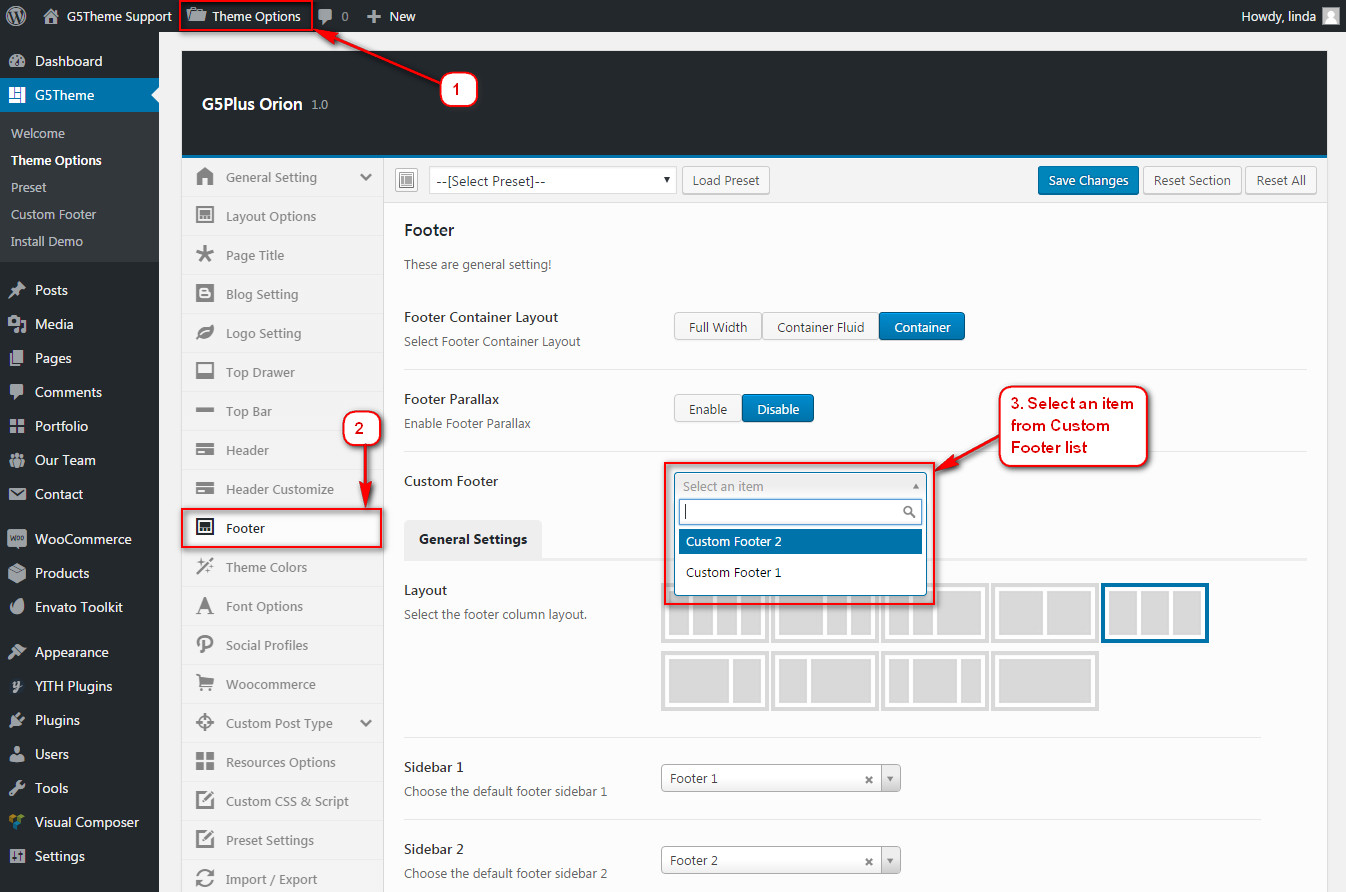
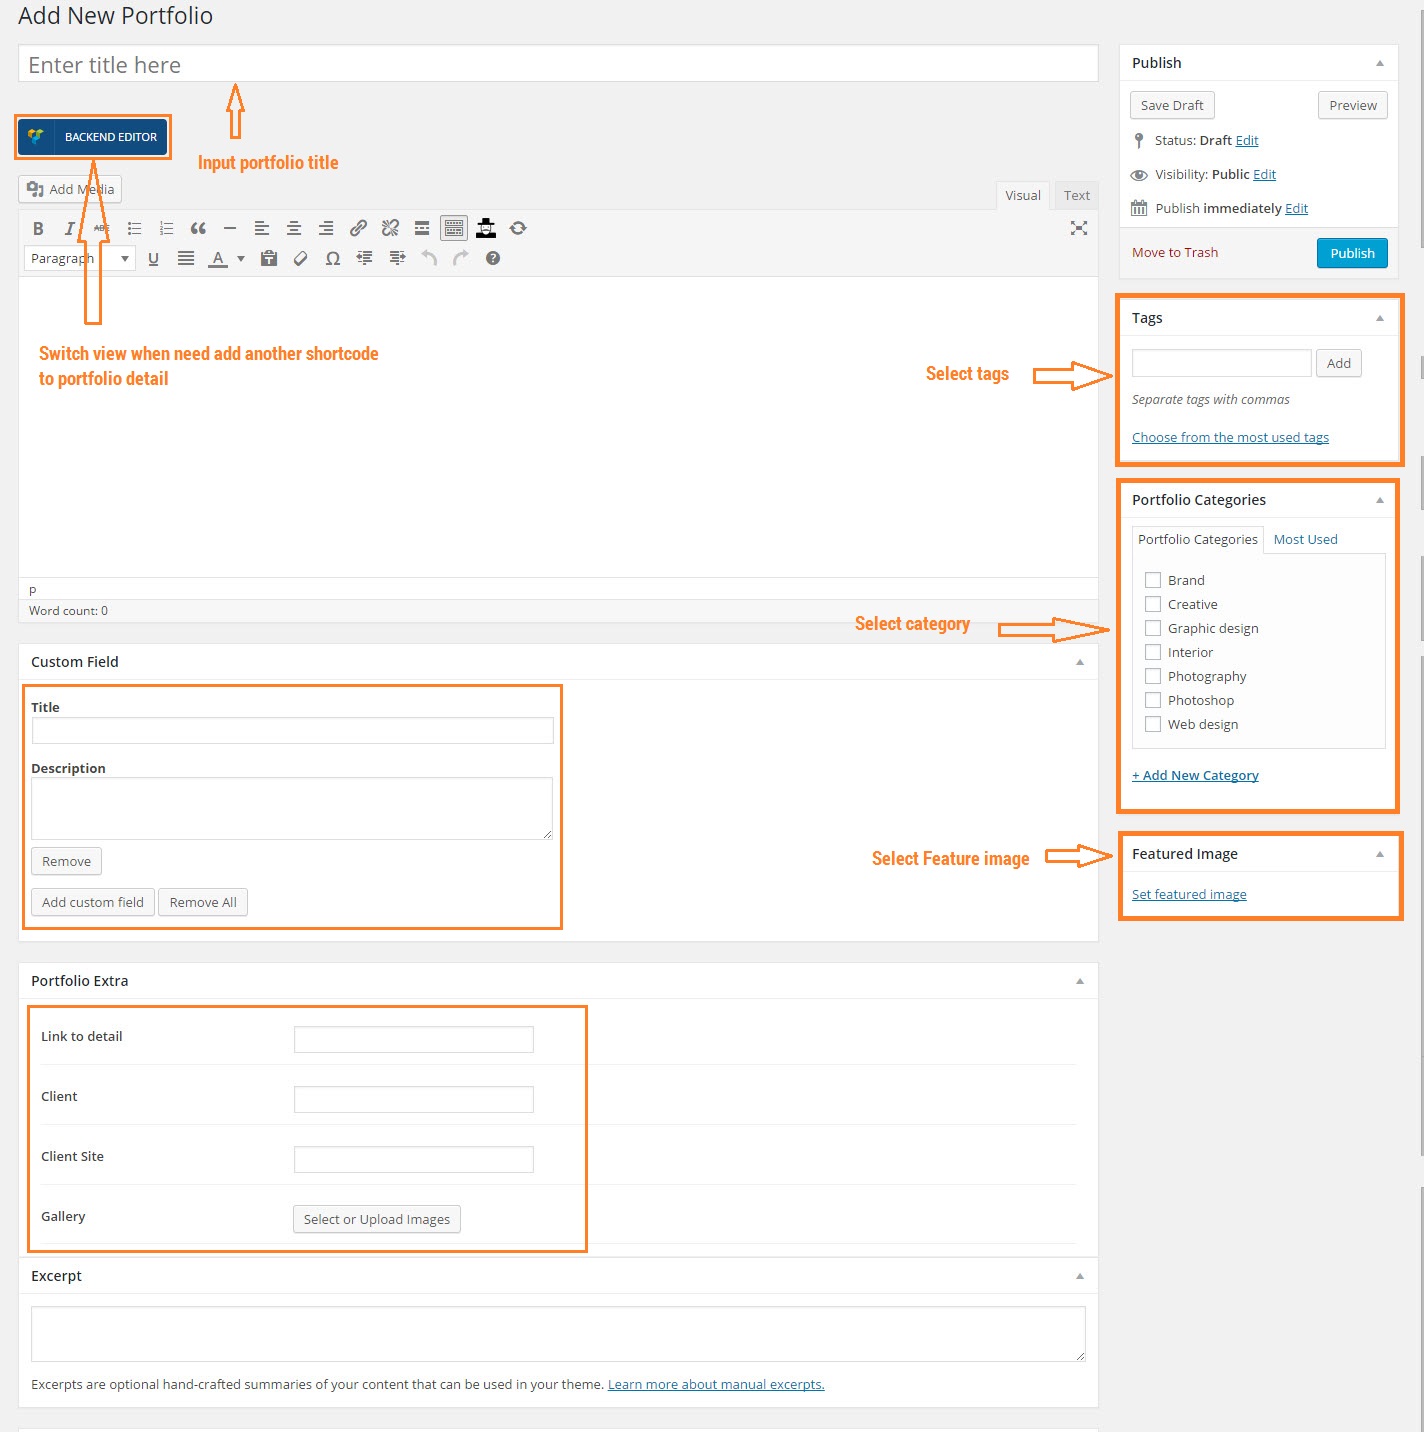
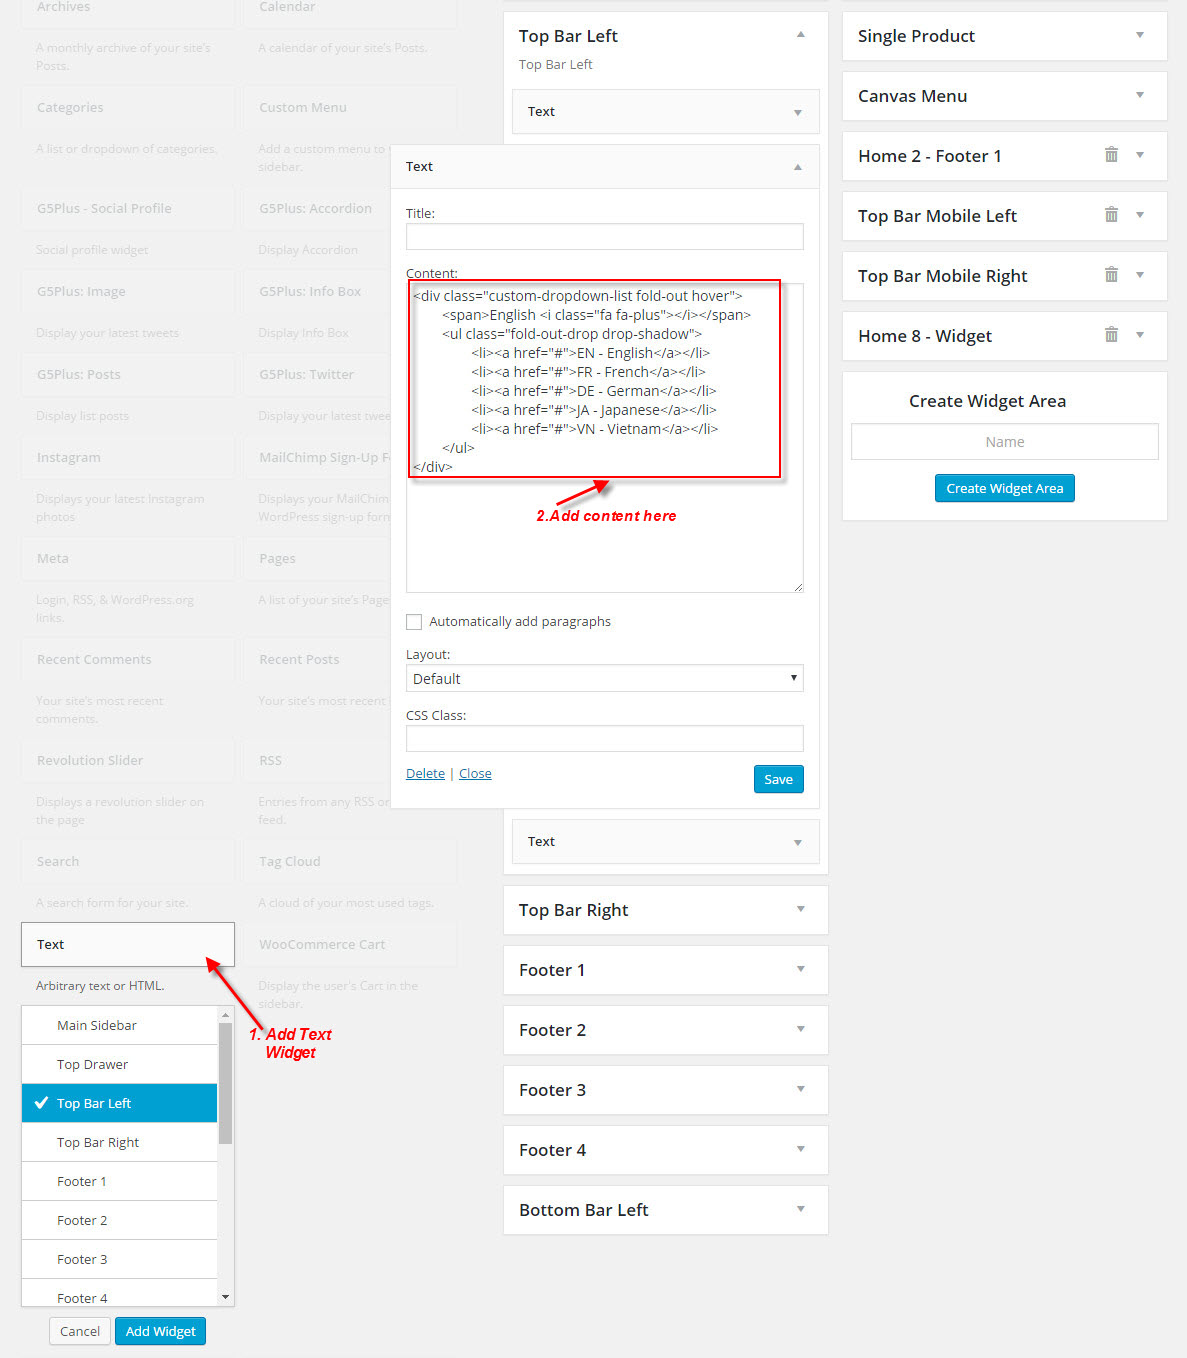
2. Use Custom Text in Theme Options

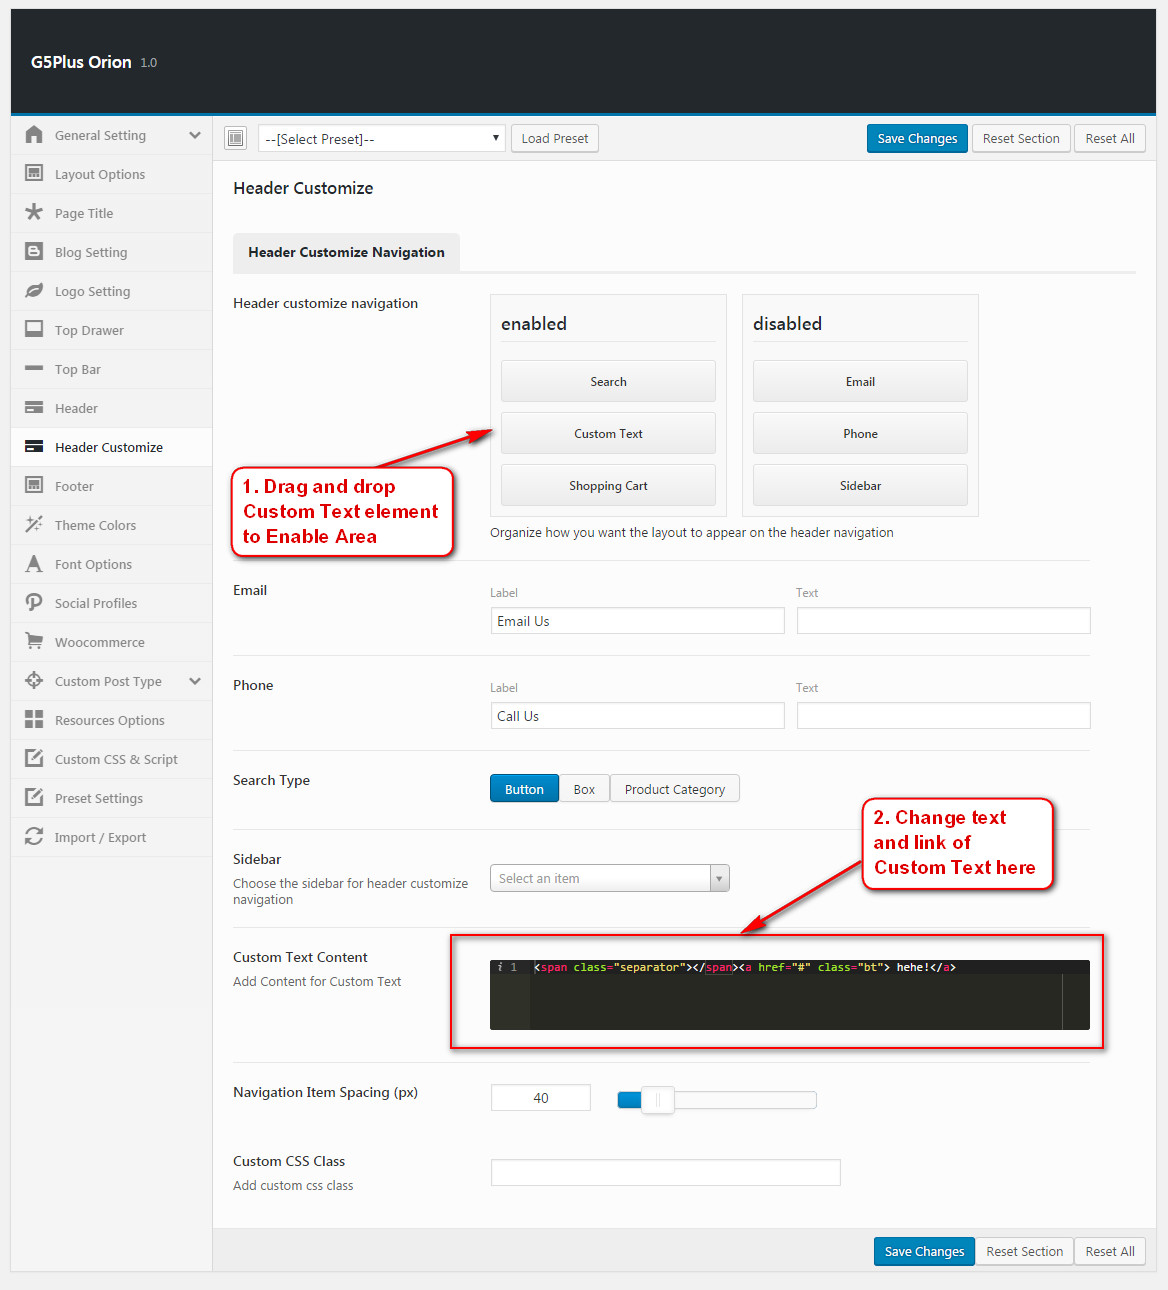
Below is a screenshot of the Header Customize option in Theme Options, we can drag and drop elements from DISABLE to ENABLE (and vice versa) for Header navigation and Custom Text as well. In below image we draged Custom Text to Enable Header Navigation, that means your Custom Text will be displayed on all the pages throughout your site, unless otherwise specified in Preset.

Then you can easily change text and link of Custom Text button in the Custom Text Content box as your liking.

orion-custom-text-4

You can use Custom Text for setup Header Area in Preset Settings or in Theme Options. If you still confuse about when will we use Preset or Theme Options, you could consult our guide on How G5Theme Options work for more details about relationship between Theme Options, Preset and Page Options and How to use them to create your website.

If you have any troubles configuring your website applications with the above settings you can contact the G5Theme Support Team by signing up and submit a new topic. G5Them Support Team will be glad to assist you.

How To Use Custom Footer on RICA/ARVO/MOVECO/ORION theme

This guide only use for RICA, ARVO, MOVECO, ORION theme!

Custom Footer function is extra Footer Area building options. Some instances you’d want a page/post have a different footer than the rest of your sight, you can use Custom Footer function in G5Them Options. It is similar to RICA, ARVO and MoveCo theme. In these theme, Custom Footer would only replace Main Footer to display on the frontend.

Note: Custom Footer has not been included in these items: ORSON,PITHREE, PORTON, HEARTSTONE, ACADEMIA, MEGATRON, HANDMADE, WOLVERINE, DARNA, INNOVATION, GROVE, ZORKA, CUPID.

In this article we will show you How To Create and Use Custom Footer on ORION theme.  To learn more about How to build Main Footer please consult our article here: https://support.g5plus.net/knowledge-base/how-to-build-main-footer/

This video focuses on Custom Footer function in G5Theme Options and explains how the Custom Footer work and how to use them properly on your website.


1. Add New Custom Footer by Visual Composer elements

orion-custom-footerAdd new an Custom Footer item

2. Set Custom Footer in Theme Options

You can create a new Custom Footer and set it to replace Main Footer in Theme Options

orion-custom-footer-2


3. Set Custom Footer in Preset Settings

You can create a new Custom Footer and set it to replace Main Footer in Preset Settings

orion-custom-footer-3

How To Use Preset

These video guides will explain How the Preset work and How to use Preset properly on your website (example on MOWASALAT theme, it is similar to other G5Theme items which has been used Preset)

Note:  Preset is not applied for these items: ORSON, PITHREE, PORTON, HEARTSTONE, ACADEMIA, MEGATRON, HANDMADE, WOLVERINE, DARNA, INNOVATION, GROVE, ZORKA, CUPID.

You could consult our guide on How G5Theme Options work for more details about the relationship between Theme Options, Preset and Page Options and How to use them to create your website.

Preset are Page Options that were set beforehand to facilitate use, it will override settings in Theme Options on all pages applyed it.

How to Add New Preset and Apply Preset to a Page/Post

Add a new Preset by accessing to Preset panel in G5Theme options, click on Add New button and follow these steps as below:

Add new Preset

preset-pageoptions

Apply Preset to Page Options

How to apply Preset to Theme Options

Access to Theme Options, select the Preset you want to apply to Theme Options then press “Load Preset” button to get all values from the Preset settings to similar options in Theme Options.
Apply a Preset to Theme Options does not only affect to an option but also all options in Theme Options.

Note: Once you choose a Preset and press Load Preset button, it will get all current values in this Preset and apply to options that corresponds in Theme Options (it means that if you change any option in this Preset later will not affect to Theme Options).


preset-theme-options3

If you have any troubles configuring your website applications with the above settings you can contact the G5Theme Support team by signing up and submit a new topic. G5Them Support Team will be glad to assist you.

Thank you for choosing G5Theme!!

How to Install G5Theme via WordPress

System Required

To install any G5Theme item, your system is required running WordPress 3.9 or higher, PHP5.4 or higher, and MySQL 5 or higher. We have tested it with Mac, Windows and Linux. Below is a list of items you should ensure your host can comply with.

Many issues that you may run into such as: white screen, demo content fails when importing, empty page content and other similar issues are all related to low PHP configuration limits. The solution is to increase the PHP limits. You can do this on your own, or contact your web host and ask them to increase those limits to a minimum as follows:

  • max_input_vars = 3000
  • memory_limit = 128M
  • max_execution_time = 300
  • max_input_time = 300
  • upload_max_filesize = 64M
  • post_max_size = 64M

Theme Installation

Step 1: Get the ORSON Theme installation package from your account (after login on Themeforest.net) at downloads page and save it to your computer.

Step 2: Login to your WordPress Dashboard

Step 3: Go to Appearance > Themes. Click the Add New button or Add new theme link.

Step 4: Click on the Upload Theme button. Navigate to the folder stores your download package, choose file name “g5plus-theme’sname-v1.0.zip” (ex: g5plus-orson-v1.0.zip) and click Install Now.

Step 5 – Click on the Activate button to activate G5Theme item.

Once your theme is activated, you need to proceed Plugins Installation.

Plugins Installation

All plugins required have been zipped/already into your download package, so you only need to do is click on the “Begin installing plugins” notice and you will be navigated to the Install Required Plugin page

install plugins

You should be navigated to the Install Required Plugin page, which shows reqquired plugins list, all you need is clicking on the checkbox beside “Plugin” label to select all plugins in the list, then choose “Install” from the drop-down list at the top and then click “Apply“.

install plugins

The installing process status will be shown in your browser. It may takes a few minutes, so please be patient.

When the notice “All installations have been completed” appears, click on the “Return to Required Plugins Installer” link to turn back to the plugin list.

install plugins

Next, click on the box beside the Plugin label again to select all plugins and choose Activate this time as image below.

active all required plugins

This video guide focuses on How to install an G5Theme item via WordPress (ex: MOWASALAT)

Congratulations, you have now install G5Theme item completely!

If you have any troubles configuring your website applications with the above settings you can contact the G5Theme Support team by signing up and submit a new topic. G5Them Support Team will be glad to assist you.

How To Use Custom Post Type

Each G5Theme item will be included different custom post types that depend on its subject, for example with MEGATRON has these Custom Post Types:

  • Pricing Table: play an important role for every company that offers products or services, and help users pick the most appropriate plan for them.
  • Service Table: provide company services
  • Our Team: Our Team is the custom post type to introduce the staff in your organization to the customer.
  • Portfolio: ORSON provide post type Portfolio to create 1 or more portfolio for your website
  • Count down: ORSON provide post type Countdown to create time count down that insert to comming soon or under construction page

It’s up to purpose of each theme item that we have difference Custom Post Types.

This video focuses on How to create a new Portfolio/Our Team item properly on your website.

CREATE A NEW PORTFOLIO ITEM

G5Theme provide a Portfolio custom post type that lets you feature your work in style. To create a new Portfolio items follow the steps below: (It is similar to other Custom Post Types)

Step 1: Go to Portfolio > Add New in your Dashboard.

Step 2: Click on Add New to create new portfolio. Create a title and insert your post content in the editing field. You can use any of our short code builder elements inside the post.

Step 3: Add Categories from the right side. To assign it to the post, check the box next to the Category name. These Categories are the filters that will sit above your portfolio images and allow you to filter the different types of projects.

Step 4: Add Tags from the right side. Type the name of the tag in the field, separate multiple tags with commas.

Step 5: To select Feature Image click the first Featured Image Box, select an image and click “Set Featured Image”. This is image that display on shortcode portfolio

Step 6: Add portfolio custom information by input to ‘Custom Field‘ section. You can add multiple file by click ‘Add custom field

Step 7: Add portfolio extra information by input to ‘Portfolio Extra‘ section. In case you want link portfolio to another page out site or in site when click portfolio you need input link to ‘Link to detail

Step 8: Select detail layout. For example in ORSON provide 7 layouts : Horizonal slide, Vertical slide, Small slide, Big slide, Center gallery small, Right gallery small, Full content

Step 9: Once you are finished, click Publish to save the portfolio post

SETTINGS CUSTOM POST TYPE

Each custom post type has each page setting to change slug, display name. To change setting custom post type follow the steps below:

Step 1: Go to ‘Custom Post Type’ (ex: Portfolio ) > Settings in your Dashboard.

Step 2: Input value to ‘New slug post type’ and ‘New name post type

Step 3: Input value to ‘New slug category‘ and ‘New name category‘ .

Step 4: Once you are finished, click ‘Save Changes‘ to save the settings

If you have any troubles configuring your website applications with the above settings you can contact the G5Theme Support Team by signing up and submit a new topic. G5Theme Support Team will be glad to assist you.

How to Create Page Using Visual Composer Shortcode

This video focuses on How to Create Page Using Shortcode (by Visual Composer) properly on your website.

G5Theme item includes several page templates to choose from, allyou need is installing Demo Data to choose the page template that suits your needs. With G5Theme item, you can create counless pages with content as your liking.

Step 1 – To add a new page/post to your WordPress site, login to your Dashboard and navigate to Page/Post>> Click Add new. The WordPress page editor looks nearly identical to the post editor, except for a few different boxes located on the right side of the screen

create-a-new-page-02

Step 2 – Input a new name for your page, and click “BACKEND EDITOR”(must installed Visual Composer plugins) to create page by Visual Composer

create-a-new-page

Step 3 – Input a new content for your page.

Step 4 – Set your Parent page. It’s normally set to No Parent.

Step 5 – Choose setting for this page.

Step 6 – Custom Page Title

Step 7 –Custom Page Title Background

Next, you can publish this page and set it as your frontpage in the WordPress Settings panel.

If you have any troubles configuring your website applications with the above settings you can contact the G5Theme Support team by signing up and submit a new topic. G5Them Support Team will be glad to assist you.

How To Import Slider

This video focuses on How to import slider properly on your website.

After setting up the homepage, you need to setup the slider for homepage to make it display the same as in live preview.

The download package contains the exported slider (Revolution Slider) that can be used as your slider template. Please follow the steps below to import it to your shop:

  • Go to “Revolution Slider
  • Click “Import Slider” button
  • When a popup appear, click “Browse” and select one of zip sliders(these files include in main file downloaded) file.
  • Click “Import Slider” button to start import the selected slider
  • Repeat the steps to import all

slider-import-01


slider-import-02

Please note that these steps are to set up slider for homepage the same as in live demo. If you want to make your own slider, please follow the official Slider Revolution document.

How to Build Header Area

This video focus on How to build Hearder Area properly on your website.

Here we use Homepage 15 on ORSON for example:

header-area-detail

You can refer our detail guide in the attached document package or this link: http://document.g5plus.net/orson

1. Build Top Bar Left

Add Three ” Text Widgets” to “Top Bar Left” Area

Go to Appearance -> Widget Manager

Add Text Widget 01:

Custom HTML

<div class="custom-dropdown-list fold-out hover">
	<span>USD <i class="fa fa-plus"></i></span>
	<ul class="fold-out-drop  drop-shadow">
	<li><a href="#">USD - US Dollar</a></li>
	<li><a href="#">EUR - Euro</a></li>
	<li><a href="#">GBP - British Pound</a></li>
	li><a href="#">INR - Indian Rupee</a></li>
	</ul>
</div>

Add Text Widget 02:

Custom HTML

<div class="custom-dropdown-list fold-out hover">
	<span>English <i class="fa fa-plus"></i></span>
	<ul class="fold-out-drop drop-shadow">
	<li><a href="#">EN - English</a></li>
	<li><a href="#">FR - French</a></li>
	<li><a href="#">DE - German</a></li>
	<li><a href="#">JA - Japanese</a></li>
	<li><a href="#">VN - Vietnam</a></li>
	</ul>
</div>

Add Text Widget 03:

2. Build Top Bar Right

Add Custom Menu and G5Plus – Social Profile Widget to “Top Bar Right” Area

Add Custom Menu Widget

For more information create menu: Cick here

Add G5Plus – Social Profile Widget :

3. Upload logo

Go to ThemeOptions >> Logo Setting tab, do follow:

4. Create Main menu

Go to Apperance >> Menus, do follow:

5. Header Settings

Go to ThemeOptions >> Header tab, then setting below


————-

If you have any troubles configuring your website applications with the above settings you can contact the G5Plus Support team by signing up and submit a new topic. We will be glad to assist you.

Thank you very much for choosing G5Theme!

How To Use Theme Options

This video focuses on How to use Theme Options work (ex: ORSON theme) and how to use them properly on your website.

– Theme Options are applied globally but can be overwritten by setting options in Page Options (and Preset). Theme Options are logically organnized into tabs, each tab contains all the options for that specific area within your site.
– To learn more about the difference between Theme Options, Page Options and Preset, Please refer to our “How G5Theme options work” article in this link: https://support.g5plus.net/knowledge-base/how-g5theme-options-work/

We highly encourage you to explore the theme options and experimentwith what all the available options can do.

If you have any troubles configuring your website applications with the above settings you can contact the G5Theme Support team by signing up and submit a new topic. We will be glad to assist you.