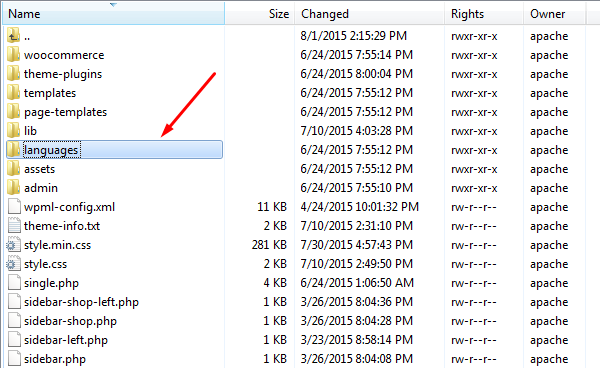
How to build menu using XMENU

X-Menu

Beside of ordinary menu setup in WordPress, XMENU that have been developed by G5Theme added a lot of options for customizing menus. XMENU is located in per menu item that you can customize them to bring your menus to new level!

You can consul XMENU documentation here: http://document.g5plus.net/xmenu/ 

This article focuses on show you How to build menu using XMENU. We used Zorka theme for example, but this step by step guide is similar to these theme: DARNA, GROVE, MEGATRON, HANDMADE, ACADEMIA, PITHREE, ORSON, RICA, MOWASALAT, ARVO, MOVECO, ORION, BEYOT so you would be able to refer.

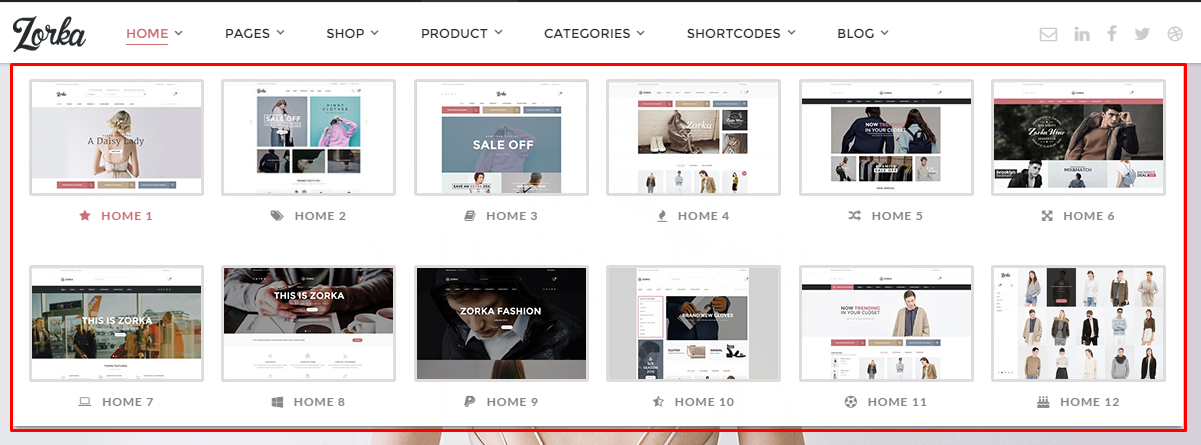
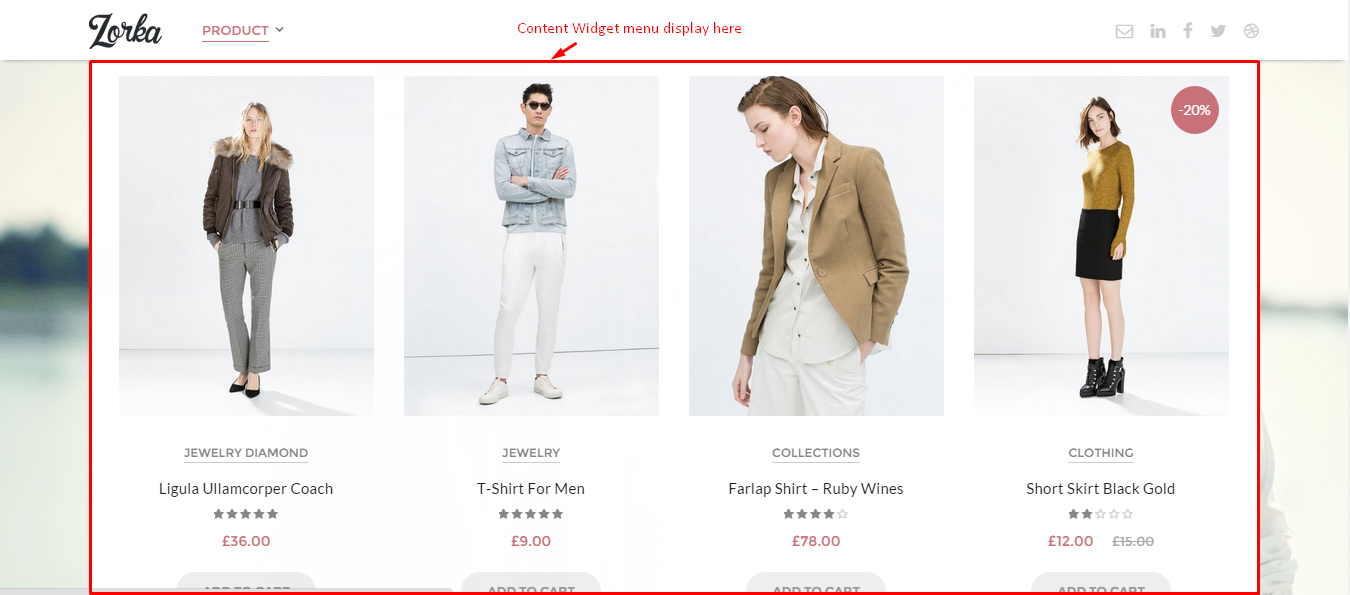
For example we will create a new menu with 2 rows, 6 columns as Zorka Demo Data, it will look like below:

create-menu-home-1

You can follow these step as below:

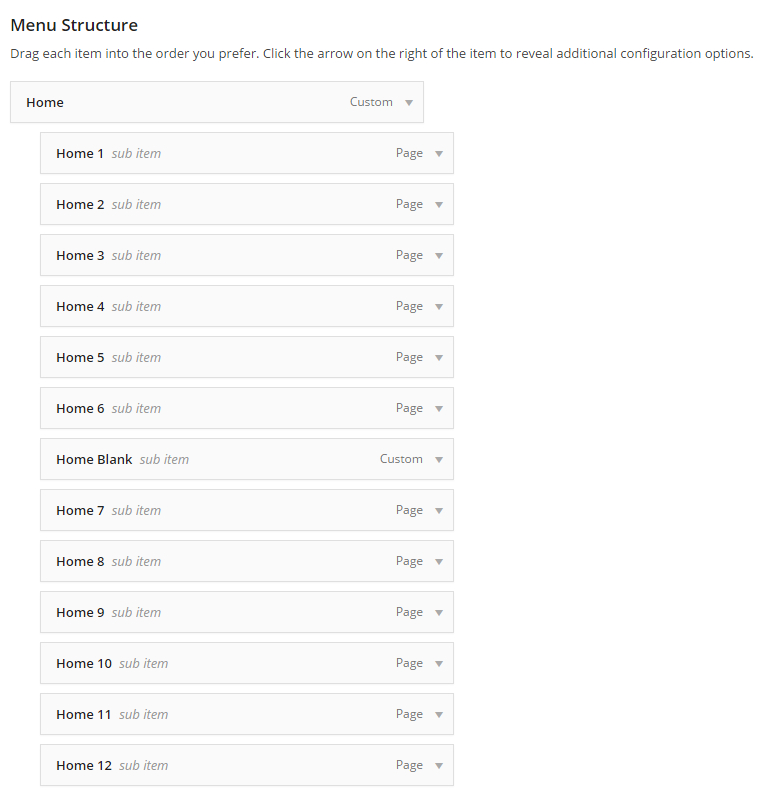
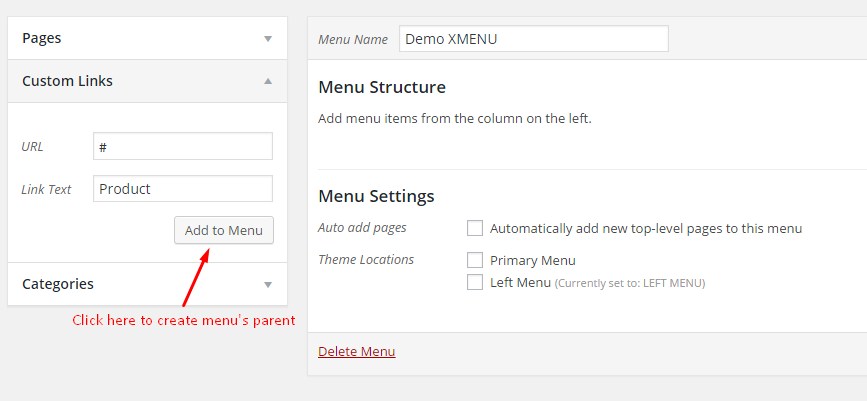
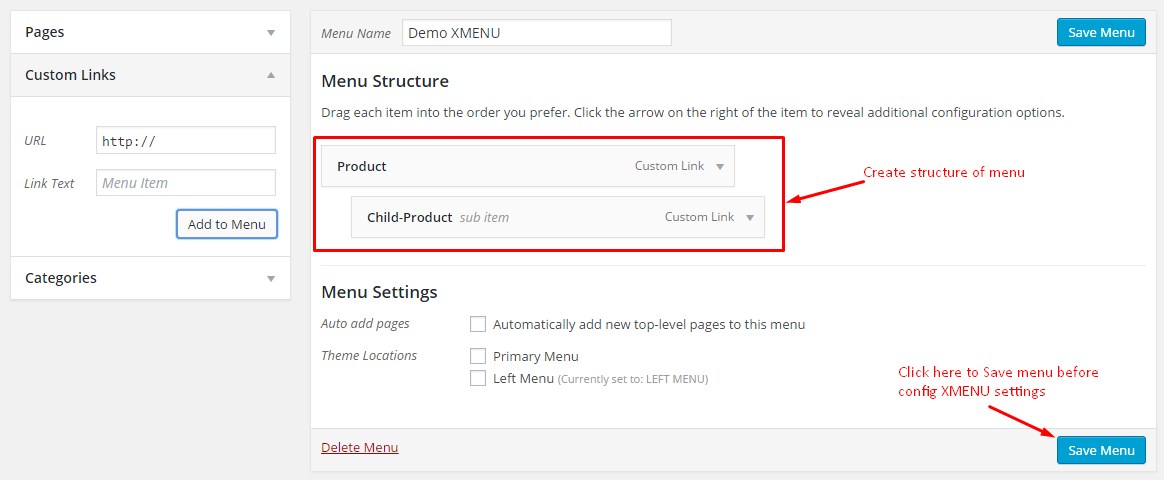
Step 1: Go to Appearance >> Menus. Add 12 menu item from Home 1 to Home 12 and 1 menu item Home Blank to seperate 2 rows as image:

create-menu-home-2
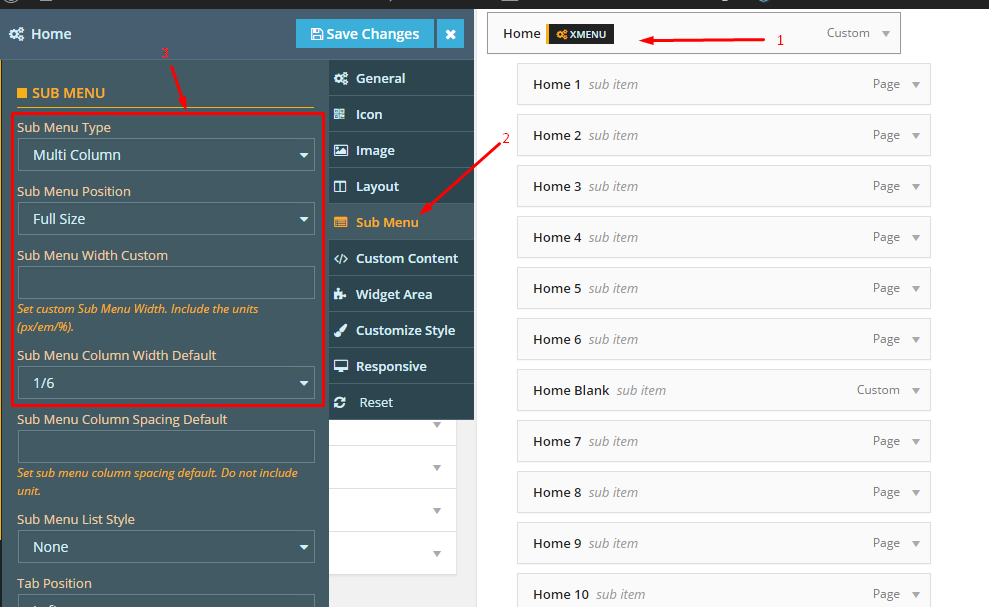
Step 2: Config menu Home on Sub Menu tab:

create-menu-home-3


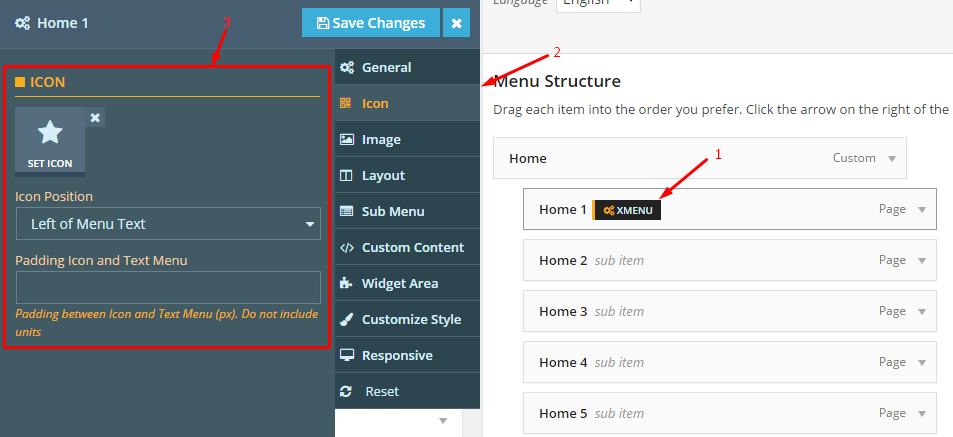
Step 3: Config for Home 1 – Home 12 as:

3.1 Config Icon tab:

create-menu-home-6

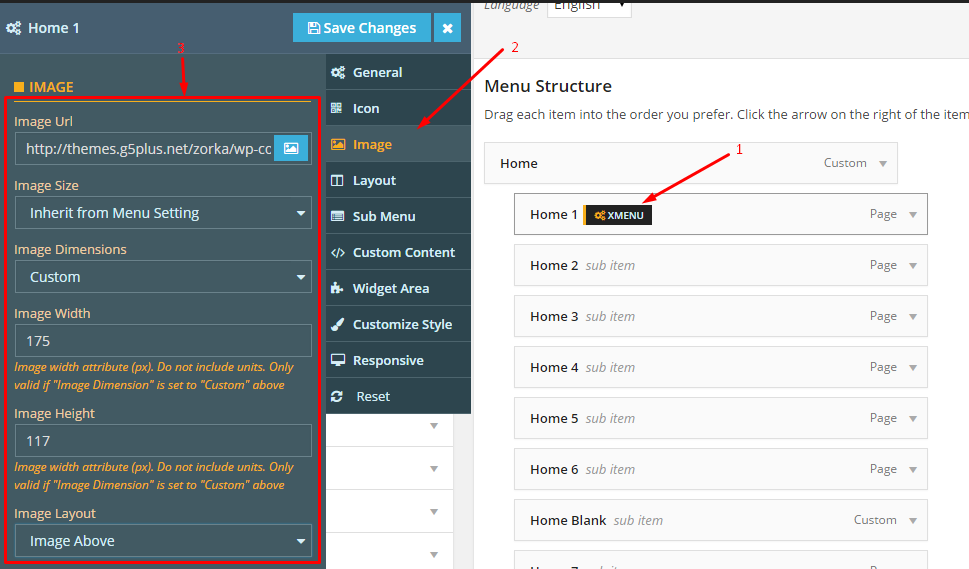
3.2 Config Image tab:

create-menu-home-4

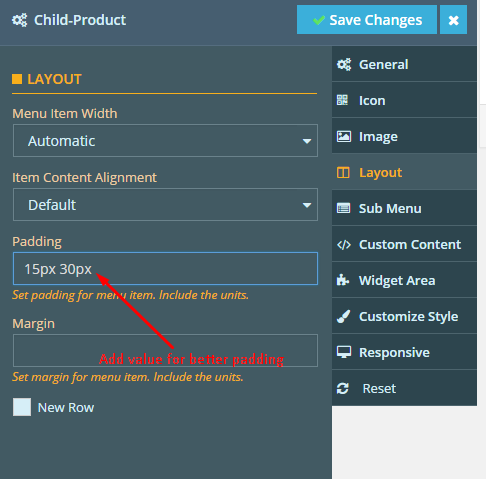
3.3 Config Layout tab:

create-menu-home-7

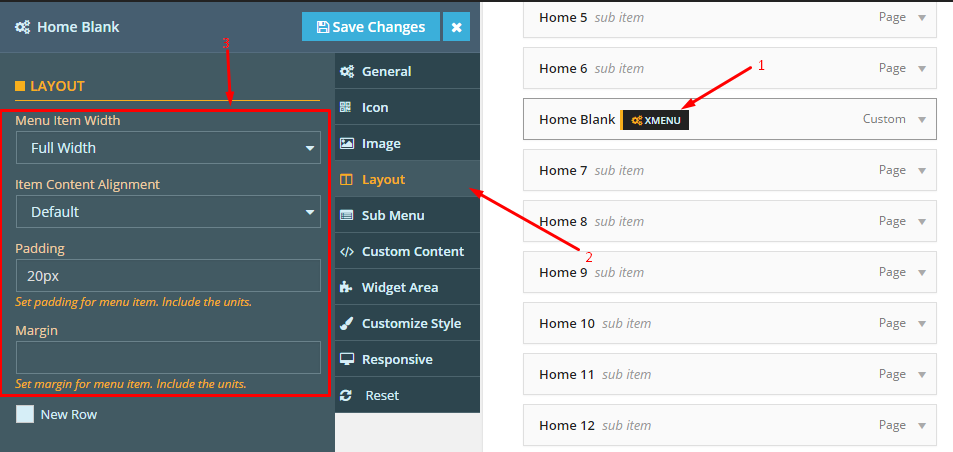
4. Config Home Blank menu on Layout tab:

create-menu-home-5


NOTICE: Recently, in our lastest themes XMENU’s appearance have had some changes as below:

xmenu

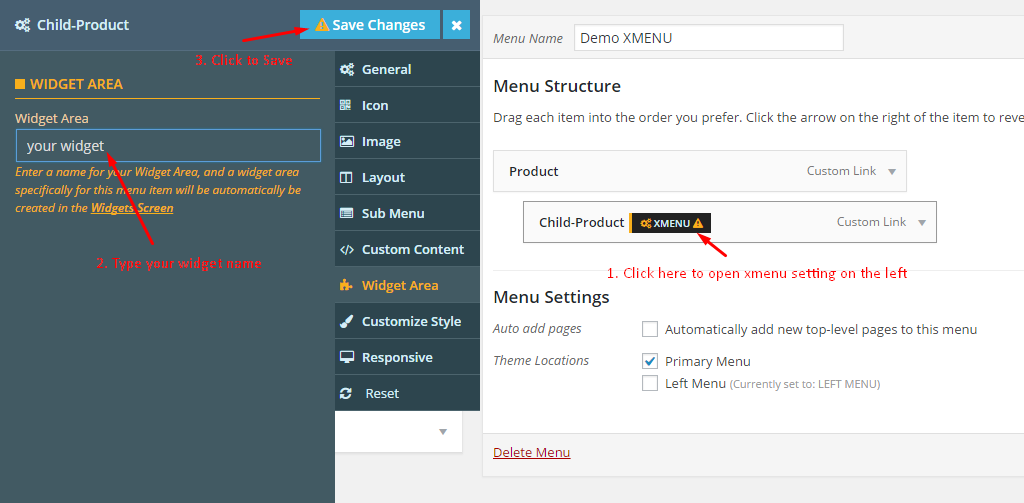
To configure settings for individual menu items or submenus, hover over the menu item you want to configure, and click the XMENU button that appears. The Menu Item Settings Panel will display from left.

These settings control a specific menu item, with options including:

  • General settings
  • Submenu (custom width, position, sub menu animation, sub menu transition)

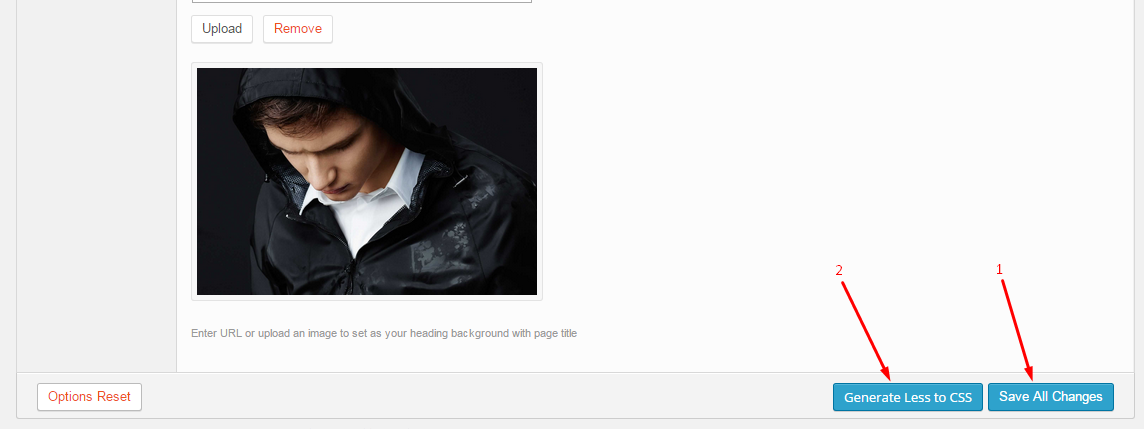
Click the Save Changes button at the top to save settings for this specific item. To configure a Submenu, click on the parent item for that submenu and then click the Submenu tab on the right.

Attribute Description
General
URL URL go to when user click this menu item
Navigation Label Title of menu item
Title Attribute Title for tag of menu item
CSS Classes Add advanced custom CSS
Link Relationship (XFN) Value for attribute rel
Description Description of the menu item
Menu Featured Select style for the menu item
Icon Select icon for the menu item
Sub Menu
Sub Menu Width Set Sub Menu Width
Sub Menu Position Select Sub Menu Position
Sub Menu Transition Select Sub Menu Transition

—————

If you have any troubles configuring your website applications with the above settings you can contact the Support Center by signing up and submit a new topic. G5Theme Support Team will be glad to assist you.

Thankyou for choosing G5Theme!


How to Change Speed Testimonials Shortcode (on GROVE)

G5Theme default value 5 seconds may be not enough to read, so in case you want it to be longer, you can change value speed testimonials shortcode.

1. Do follow to custom value:
– Go to this path: /your_website_directory/wp-content/plugins/grove-shortcode/testimonial, edit file testimonial.php then go to line 99 and 125 or line have class “owl-carousel“, view here:

change-speed

and here:

change-speed1

– Change value as you want: 1000 is 1 second

2. Download testimonial.zip at https://support.g5plus.net/wp-content/uploads/2015/08/testimonial.zip then extract and replace file testimonial.php on this path: /your_website_directory/wp-content/plugins/grove-shortcode/testimonial => value default is 10000.

You can refer its document for more customization: http://owlgraphic.com/owlcarousel/#customizing
You only need add param as above document. All done.

————
If you have any troubles configuring your website applications with the above settings you can contact the Support Center by signing up and submit a new topic. G5Theme Support Team will be glad to assist you.
Thank you very much for choosing G5Theme!

How to Create XMENU with Widget Area Content?

Have you ever want to create menu look like this:

create-widget-00

This article will show you How to create mega menu with Widget Area content, please follow our step by step on each images:

Step 1: Create menu parent

create-widget-01

And child menu:

create-widget-02

Create structure menu:

create-widget-03

Result here:

create-widget-04

Step 2: Create dynamic widget area for menu

create-widget-05

Go to widgets manager:

create-widget-06

Result here:

create-widget-07

Step 3: Add content to widget area(which created by Step 2)

create-widget-08

Setting parameter:

create-widget-09

Save data:

create-widget-10

Step 4(addition): Setting other paramater for look the same image screenshot result.

Disable text on menu:

create-widget-11

Add padding:

create-widget-12

Step 5: Result all here

create-widget-13

DONE.

————
If you have any troubles configuring your website applications with the above settings you can contact the Support Center by signing up and submit a new topic. G5Theme Support Team will be glad to assist you.
Thank you very much for choosing G5Theme!

How to assign your menu to XMENU on ZORKA theme

This video guide focuses on show you How to assign your menu to XMENU on ZORKA theme

————
If you have any troubles configuring your website applications with the above settings you can contact the Support Center by signing up and submit a new topic. G5Theme Support Team will be glad to assist you.
Thank you very much for choosing G5Theme!

How to change languages via po/mo file?

Very few developers develop their plugins and themes in a language different from English so you will have to translate the phrase in theme and plugins into many different languages by yourself, and I’ll explain to you how. There are two ways to do it.

– Directly within WordPress by using a localization plugin (such as Loco Translate plugin – that’s free and most of my customers used successfully). You can also consult our guide on How to Translate using LOCO Translate plugin
– On your PC/Mac, using Poedit. To change the value field of the theme via language file, you can do follow one of 2 methods below.

Method 1.

Edit .po/pot file(in directory languages) as the image below(root is my theme):

languages
– Rename file corresponding with your Locale here: https://make.wordpress.org/polyglots/teams/
(In this article I will get an example: change en_US.po to it_IT.po). View image:

choose-local
– Then download & install Gettext Translations Editor software(free) at https://poedit.net/wordpress
– Edit new file(it_IT.po) with software just installed.
– Change/add value as you want, then convert .po to mo file via http://po2mo.net/.
+Open http://po2mo.net/ choose .po file, click ‘Convert‘ button.

click-convert
   + Then download MO file after convert.
donwload-mo-local
The file downloaded has the name look like: abcdedg_it_IT.mo, change file name downloaded to “your_local.mo” file. Example: changed to it_IT.mo

Method 2.

Download and install software Gettext Translations Editor at https://poedit.net/wordpress then open/edit file .po/pot on the path as the image above(method 1).
After changed content/value, click Save:
– If exist po/mo files language as you want => it will override current.
– If not exist, do follow:

create-translation
After all, you will get file name look like: it_IT.mo

Last step for both mothed: 
Copy/upload .mo file up to languages directory(in my theme) on your server.

Note: to active your local language, you must go to Settings >> General menu, do follow:

choose-language-backend


Thanks
G5Theme

How to Install Zorka via WordPress

This video guide focuses on show you How to install ZORKA via WordPress

————
If you have any troubles configuring your website applications with the above settings you can contact the Support Center by signing up and submit a new topic. G5Theme Support Team will be glad to assist you.
Thank you very much for choosing G5Theme!

Why “Install Demo Data” completed, but website not load success?

To these theme: CUPID, ZORKA, GROVE, DARNA, WOLVERINE, HANDMADE, MEGATRON, ACADEMIA  when you have “Install Demo Data” completed but website not load success, please follow below instruction to fix this issue.
First, you should check Why “One Click Install Demo Data” not completed? to know more about variables on your server.
If everything done, after installation process finish, go to Theme Options then you click “Save All Changes” and click “Generate Less to CSS” button. Look like below:

generate-less-to-css

Why “One Click Install Demo Data” not completed?

In this case One Click Install Demo Data can’t completed, please check follow:

1. What version php do you using? If lower 5.4, please update to 5.4 or greater.
2. Check your folder theme has permission create/write file? if not, please set permission for it.
3. Did you do as our document?
That is:
PLEASE SET VALUE FOR VARIABLES BELOW IN PHP.INI/.htaccess or some where(ask your hosting provider) BEFORE DO “One Click Install Demo Data” function:

  • max_input_vars = 3000
  • memory_limit = 128M
  • max_execution_time = 300
  • max_input_time = 300
  • upload_max_filesize = 64M
  • post_max_size = 64M

Follow this instruction to increase the memory limit: https://support.g5plus.net/knowledge-base/system-required/

4. Make sure directory: [your_theme]\assets\data-demo\log has permission can create/write file.
In case, you done this way but it doesn’t work well, please open wp-config.php to edit, add line:
define(‘FS_METHOD’, ‘direct’);

5. Make sure can create directory “uploads” on [your_theme]\wp-content\uploads and can create files in it.
If you did all but still error, please create topic and give me your account website and account ftp to check.
Thanks for your time.

How to get my Envato purchase code?

Please follow the instruction in screenshot below to get the license file for your purchase on Envato.

– Login on Themeforest.net and go to your Download page

– You will find out your PURCHASE CODE in that license file.

purchase-code


If you have any troubles configuring your website applications with the above settings you can contact the Support Center by signing up and submit a new topic. G5Theme Support Team will be glad to assist you.

Thank you for choosing G5Theme!

Where do I find Visual Composer License Key?

We don’t provide license key of Visual Composer in download package, you can’t find it in your package downloads. Visual Composer (We bought extended license of this plugin) but current have note solution for activate with this plugin. license key only can activate 1 time 🙁
We created new ticket on http://support.wpbakery.com/ and here is the answer from developer of Visual Composer

It is not possible for theme buyer to activate the license (and hence to auto-update the Visual Composer) as they have not purchased the license directly from us, but has received it in-directly from the theme. In this case, you must update the version in the theme and must release a theme update which the buyers can download and hence in-turn will receive the latest version of Visual Composer.

We’re sorry about this inconvenience but we will update our themes to run follow Visual Composer updates.

I bought Extended license for all my items(theme), read more here: https://codecanyon.net/licenses/terms/extended

Review Standard license: https://codecanyon.net/licenses/standard

Please read Bunded Plugins here: https://help.market.envato.com/hc/en-us/articles/213762463-Bundled-Plugins

Thanks & Hope all customers know that.